
今回の内容
今回はステージに配置するコインを実装します。
※初めての方はこちらから
⇒ 【第1回記事】導入とサンプルの紹介
アセットのインポートとプレハブ化
以下のアセットをインポートしてください。
使用するのはコインのアセットです。
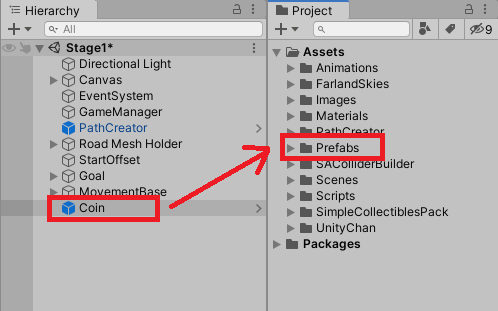
SimpleCollectiblesPack > prefabs > CoinGold を Stage1シーンに配置します。
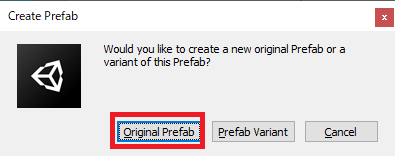
名前を Coin に変更して、Assets > Prefabs フォルダにオリジナルプレハブとして保存しましょう。
(関連記事)
プレハブの使い方①(作成・複製)
初期設定
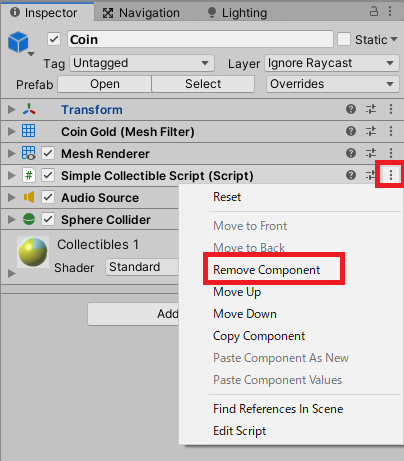
まずは元のプレハブで設定されている内容を変更していきます。
SimpleCollectibleScript を削除します。
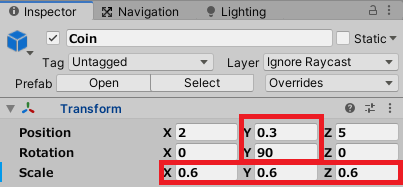
Transform を調整します。
大事なのはY方向の位置・回転、全方向のスケールです。
XZ方向の位置はステージ上ならどこでもかまいません。
コインの色が暗いので、明るい黄色っぽく変更します。
Assets > Materials フォルダに新規マテリアルを作成して、CoinMaterial とします。
以下のような設定として下さい。
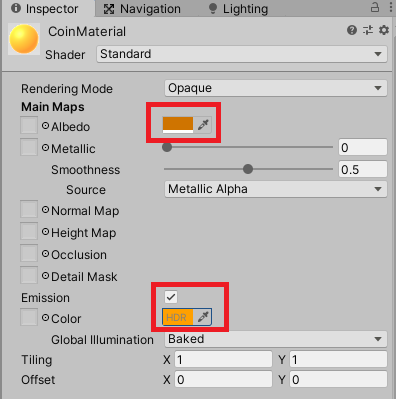
これを、Coinオブジェクトにドラッグ&ドロップで設定します。
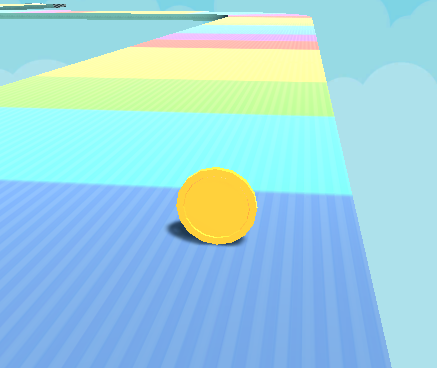
下図のような色になっていればOKです。(色はお好みで調整して下さい。)
CoinScriptの作成
新規スクリプトを作成して名前は CoinScript として、以下を記述します。
using System.Collections;
using System.Collections.Generic;
using UnityEngine;

public class CoinScript : MonoBehaviour
{
    float speed = 100f;

    bool isGet;             // 獲得済みフラグ
    float lifeTime = 0.5f;  // 獲得後の生存時間

    void Start()
    {

    }

    void Update()
    {
        // 獲得後
        if (isGet)
        {
            // 素早く回転
            transform.Rotate(Vector3.up * speed * 10f * Time.deltaTime, Space.World);

            // 生存時間を減らす
            lifeTime -= Time.deltaTime;

            // 生存時間が0以下になったら消滅
            if (lifeTime <= 0)
            {
                Destroy(gameObject);
            }
        }
        // 獲得前
        else
        {
            // ゆっくり回転
            transform.Rotate(Vector3.up * speed * Time.deltaTime, Space.World);
        }
    }

    private void OnTriggerEnter(Collider other)
    {
        // プレイヤーが接触で獲得判定
        if (!isGet && other.CompareTag("Player"))
        {
            isGet = true;

            // コインを上にポップさせる
            transform.position += Vector3.up * 1.5f;
        }
    }
}
1つ1つはシンプルな処理ですので、コメントを参考に読んでみて下さい。
これを Coin にアタッチしたら、シーンを再生しましょう。
プレイヤー接触前はゆっくり回転し、接触後はポップアップして素早く回転、
その後0.5秒で消滅していれば成功です。

一旦ここまでをプレハブにも反映しておきましょう。
Hierarchyビューで Coinオブジェクトを選択して、Insepectorビューから Overrides > Apply All をクリックで反映できます。

※この後も使う操作なので覚えておきましょう。
(関連記事)
プレハブの使い方②(編集)
コインの獲得時のサウンドを設定
獲得時の効果音はご自身で自由に用意してください。
ここでは、コチラのサイトの coin03 を使用します。
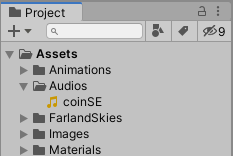
Assets > Audios フォルダを作成します。
効果音素材の名前を coinSE など分かりやすいものにして、Audiosフォルダにインポートします。
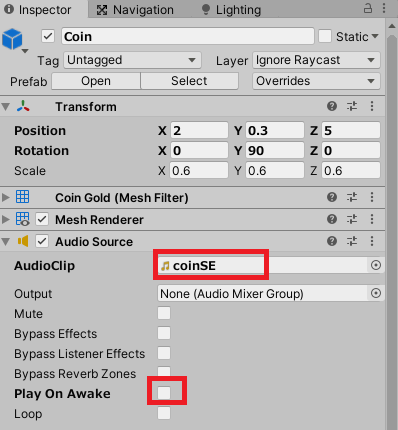
Coinオブジェクトの AudioSourceコンポーネントを変更します。
AudioClip に coinSE を設定し、Play On Awake のチェックは外します。
CoinScript を変更して、獲得時に効果音が再生されるようコードを追加します。
using System.Collections;
using System.Collections.Generic;
using UnityEngine;

public class CoinScript : MonoBehaviour
{
    float speed = 100f;

    bool isGet;             // 獲得済みフラグ
    float lifeTime = 0.5f;  // 獲得後の生存時間

    void Start()
    {

    }

    void Update()
    {
        // 獲得後
        if (isGet)
        {
            // 素早く回転
            transform.Rotate(Vector3.up * speed * 10f * Time.deltaTime, Space.World);

            // 生存時間を減らす
            lifeTime -= Time.deltaTime;

            // 生存時間が0以下になったら消滅
            if (lifeTime <= 0)
            {
                Destroy(gameObject);
            }
        }
        // 獲得前
        else
        {
            // ゆっくり回転
            transform.Rotate(Vector3.up * speed * Time.deltaTime, Space.World);
        }
    }

    private void OnTriggerEnter(Collider other)
    {
        // プレイヤーが接触で獲得判定
        if (!isGet && other.CompareTag("Player"))
        {
            isGet = true;

            GetComponent<AudioSource>().Play();

            // コインを上にポップさせる
            transform.position += Vector3.up * 1.5f;
        }
    }
}
シーンを再生して、コイン獲得時に効果音が再生されれば成功です。
(関連記事)
BGM・SE(効果音)の付け方
コインの獲得枚数を管理
最後にコインの獲得枚数を管理する仕組みを作成します。
まずは GameManagerScript を以下の通り変更します。
using System.Collections;
using System.Collections.Generic;
using UnityEngine;

public class GameManagerScript : MonoBehaviour
{
    public enum GAME_STATUS { Play, Clear, Pause, GameOver };
    public static GAME_STATUS status;

    public static int tempCoinNum;

    void Start()
    {
        // ステータスをPlayに
        status = GAME_STATUS.Play;
    }

    void Update()
    {

    }
}
GameManagerScript の tempCoinNum で獲得コイン数を管理します。
次に CoinScript で、コイン獲得時に枚数を加算する処理を記述します。
using System.Collections;
using System.Collections.Generic;
using UnityEngine;
public class CoinScript : MonoBehaviour
{
float speed = 100f;
bool isGet; // 獲得済みフラグ
float lifeTime = 0.5f; // 獲得後の生存時間
void Start()
{
}
void Update()
{
// 獲得後
if (isGet)
{
// 素早く回転
transform.Rotate(Vector3.up * speed * 10f * Time.deltaTime, Space.World);
// 生存時間を減らす
lifeTime -= Time.deltaTime;
// 生存時間が0以下になったら消滅
if (lifeTime <= 0)
{
Destroy(gameObject);
}
}
// 獲得前
else
{
// ゆっくり回転
transform.Rotate(Vector3.up * speed * Time.deltaTime, Space.World);
}
}
private void OnTriggerEnter(Collider other)
{
// プレイヤーが接触で獲得判定
if (!isGet && other.CompareTag("Player"))
{
isGet = true;
GetComponent<AudioSource>().Play();
GameManagerScript.tempCoinNum++;
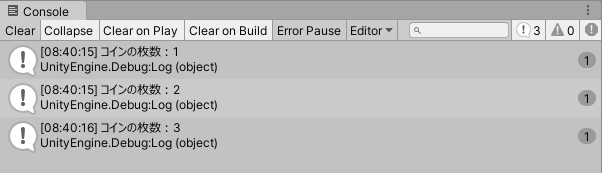
Debug.Log("コインの枚数:" + GameManagerScript.tempCoinNum);
// コインを上にポップさせる
transform.position += Vector3.up * 1.5f;
}
}
}
51行目で加算する処理を行っています。
52行目は確認用なので、確認ができたら消してもかまいません。
ここまでできたら再度プレハブを更新します。
ステージに何枚かコインを配置して、コイン獲得時にログが表示されていれば成功です。
おわりに
コインの実装は完了となります。
次回はゲーム内UIの作成を行い、コインの枚数やステージ数などの表示を実装します!
関連リンク ➡ 「初心者のための」Unityゲーム制作 目次
© Unity Technologies Japan/UCL


