JavaScriptとVueの勉強を兼ねて、お絵描きツールをVueで作成してみました。
JavaScriptのお絵描きツールは検索するとすぐに紹介記事がヒットしたので、
そのうちの一つをベースに、練習がてらVueでリプレースしています。
↓ 参考にしたサイト(以下をベースにVueでリプレース)
HTMLのcanvasとJavaScriptでお絵かきアプリ作る(外部リンク)
※Vueはインストール済みとします。
1.プロジェクト作成
任意のディレクトリで以下コマンドを実行し、プロジェクトを作成します。
vue create vue_drawtool
2.DrawTool.vue追加
/src/components配下に「DrawTool.vue」を作成します。
中身はまずは以下にしておきます。
<template>
    <div>
        <h1>DrawTool</h1>
    </div>
</template>
さらにApp.vueで読み込むよう、以下の様に変更しましょう。
(デフォルトのHelloWorld周りを変更)
<template>
  <div id="app">
    <DrawTool />
  </div>
</template>

<script>
import DrawTool from './components/DrawTool.vue'

export default {
  name: 'App',
  components: {
    DrawTool
  }
}
</script>
以下コマンドでローカルサーバを起動しましょう。
cd vue_drawtool
npm run serve
http://localhost:8080/ にアクセスして、以下のページになっていればOKです。

3.描画機能の作成
まずは描画機能を用意します。
テンプレートとしてcanvasを追加します。
styleとしてcanvas部分に枠線を当てました。
<template>
  <div>
    <h1>DrawTool</h1>
    <div id="canvas-area">
      <canvas id="myCanvas" width="640px" height="800px" @mousedown="dragStart" @mouseup="dragEnd" @mouseout="dragEnd" @mousemove="draw"></canvas>
    </div>
  </div>
</template>

~ 省略 ~

<style scoped>
#myCanvas {
 border: 1px solid #000000;
}
</style>
canvasの各イベントに対応するメソッドを作成します。
script部分を以下にしましょう。
<script>
export default {
  name: "DrawTool",
  data() {
    return {
        canvas: null,
        context: null,
        isDrag: false
    };
  },
  mounted(){
      this.canvas = document.querySelector('#myCanvas')
      this.context = this.canvas.getContext('2d')
      this.context.lineCap = 'round';
      this.context.lineJoin = 'round';
      this.context.lineWidth = 5;
      this.context.strokeStyle = '#000000';
  },
  methods: {
    // 描画
    draw :function(e) {
      var x = e.layerX
      var y = e.layerY

      if(!this.isDrag) {
        return;
      }

      this.context.lineTo(x, y);
      this.context.stroke();
    },
    // 描画開始(mousedown)
    dragStart:function(e) {
      var x = e.layerX
      var y = e.layerY

      this.context.beginPath();
      this.context.lineTo(x, y);
      this.context.stroke();

      this.isDrag = true;
    },
    // 描画終了(mouseup, mouseout)
    dragEnd: function() {
      this.context.closePath();
      this.isDrag = false;
    }
  }
};
</script>
canvasについて参考にしているとmoveToで開始地点を指定していますが、
無くても問題無さそうでしたので、削除してスッキリさせています。(問題あったらスミマセン。。)
再度ブラウザで確認して、以下の様にマウスドラッグで描画ができればOKです。

4.クリアボタンを追加
テンプレートに以下の様にクリアボタンを追加しましょう。
<template>
  <div>
    <h1>DrawTool</h1>
    <div id="canvas-area">
      <canvas id="myCanvas" v-bind:class="{eraser: canvasMode === 'eraser'}" width="640px" height="800px" @mousedown="dragStart" @mouseup="dragEnd" @mouseout="dragEnd" @mousemove="draw"></canvas>
    </div>
    <div id="tool-area">
        <button id="clear-button" @click="clear">クリア</button>
    </div>
  </div>
</template>
canvasをクリアするプログラムは簡単で、以下のメソッドを追加します。
  methods: {
    ~ 省略 ~

    // クリア
    clear: function() {
      this.context.clearRect(0, 0, this.canvas.width, this.canvas.height);
    }
  }
クリアボタンをクリックすると、canvas内がクリアされることを確認してください。
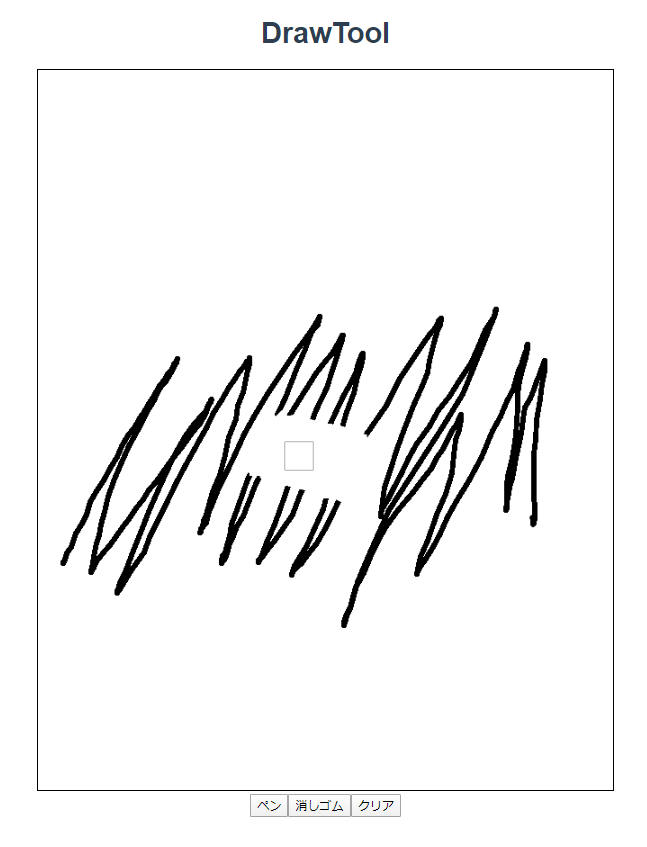
5.消しゴムモードの実装
消しゴムモードを実装してみます。
マウスドラッグで描画する代わりに、なぞった箇所を消すようにします。
消しゴムモード用のポインタ画像を用意したのでまずはダウンロードしてください。
![]()
(↑ 右クリックから名前を付けて保存、等)
この画像は、「/src/assets/image/eraser.png」となるように配置します。
(imageフォルダは自分で作成します。)
では、テンプレートに消しゴムモード用のボタンを追加しますが、
ペンモードにも戻れるようにしたいので、以下の様に2つボタンを追加します。(8,9行目)
また、canvasタグ内にeraserクラスをバインドする処理を入れています。(5行目)
<template>
  <div>
    <h1>DrawTool</h1>
    <div id="canvas-area">
      <canvas id="myCanvas" v-bind:class="{eraser: canvasMode === 'eraser'}" width="640px" height="800px" @mousedown="dragStart" @mouseup="dragEnd" @mouseout="dragEnd" @mousemove="draw"></canvas>
    </div>
    <div id="tool-area">
        <button id="pen-button" @click="pen">ペン</button>
        <button id="eraser-button" @click="erase" >消しゴム</button>
        <button id="clear-button" @click="clear">クリア</button>
    </div>
  </div>
</template>
追加したv-bindによって、消しゴムモード時にはcanvasにeraserクラスが付与されます。
eraserクラスのcssを以下の様に記述してください。
カーソルを先ほどのeraser.pngに変更するようにしています。
<style scoped>
~ 省略 ~

.eraser {
    cursor: url(../assets/image/eraser.png) 15 15,auto;
}
</style>
残りはスクリプト部分です。
モードを管理するために、data内にパラメータcanvasModeを追加します。
デフォルトは「pen」としておきます。
  data() {
    return {
        canvasMode: 'pen',  // ← 追加
        canvas: null,
        context: null,
        isDrag: false,
    };
  },
ペンモードボタン、消しゴムモードボタンクリック時の各メソッドを追加して完成です。
methods内に、以下の2つを追加してください。
methods: {
    // ペンモード
    pen: function(){
      // カーソル変更
      this.canvasMode = 'pen'

      // 描画設定
      this.context.lineCap = 'round';
      this.context.lineJoin = 'round';
      this.context.lineWidth = 5;
      this.context.strokeStyle = '#000000';
    },
    // 消しゴムモード
    eraser: function() {
      // カーソル変更
      this.canvasMode = 'eraser'

      // 描画設定
      this.context.lineCap = 'square';
      this.context.lineJoin = 'square';
      this.context.lineWidth = 30;
      this.context.strokeStyle = '#FFFFFF';
    }
  }
ここまでできたら動作確認してみます。
消しゴムモードでカーソルが変わって、ドラッグで文字を消せることを確認してください。
6.ペン色を追加
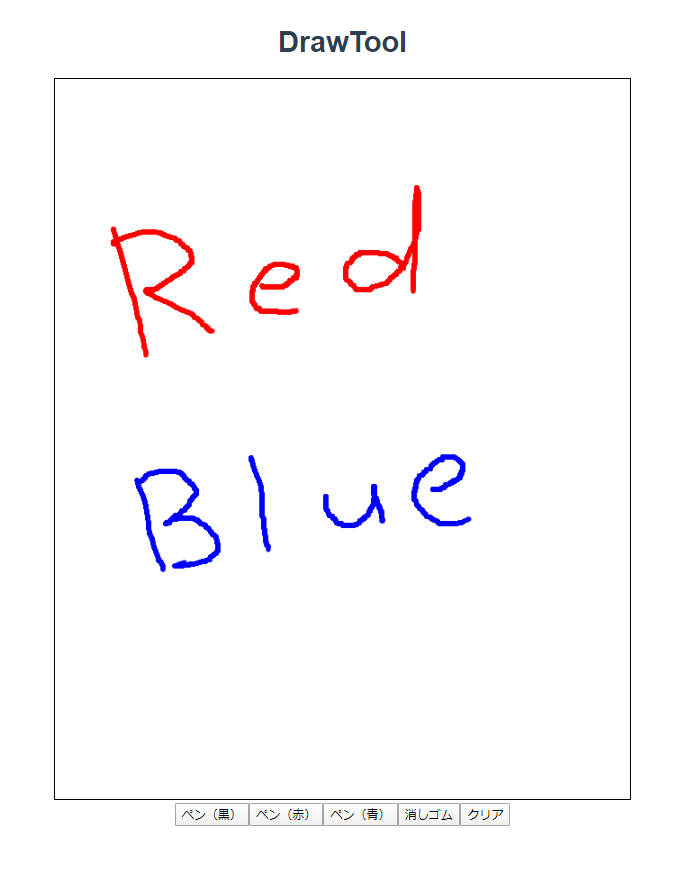
ペンモードを実装したついでに、ペン色を追加して見ましょう。
今回は、赤と青の2色を追加することにします。
併せて、既存のペンモードを微修正します。
<template>
  <div>
    <h1>DrawTool</h1>
    <div id="canvas-area">
      <canvas id="myCanvas" v-bind:class="{eraser: canvasMode === 'eraser'}" width="640px" height="800px" @mousedown="dragStart" @mouseup="dragEnd" @mouseout="dragEnd" @mousemove="draw"></canvas>
    </div>
    <div id="tool-area">
        <button id="pen-black-button" @click="penBlack">ペン(黒)</button>
        <button id="pen-red-button" @click="penRed">ペン(赤)</button>
        <button id="pen-blue-button" @click="penBlue">ペン(青)</button>
        <button id="eraser-button" @click="eraser" >消しゴム</button>
        <button id="clear-button" @click="clear">クリア</button>
    </div>
  </div>
</template>
元々あった「ペン」ボタンを「ペン(黒)」に変えました。
idやメソッド名も変わっているので注意してください。
ではスクリプトの実装ですが、まずはdata部分を微修正します。
canvasModeのデフォルト値を、「pen」から「penBlack」に変更します。
  data() {
    return {
        canvasMode: 'penBlack',
        canvas: null,
        context: null,
        isDrag: false,
    };
  },
続けて、methods側の修正と追加です。
元々の「pen」メソッドは「penBlack」に置き換えて、
「penRed」と「penBlue」を追加してください。
  methods: {
    ~ 省略 ~

    // ペンモード(黒)
    penBlack: function(){
      // カーソル変更
      this.canvasMode = 'penBlack'

      // 描画設定
      this.context.lineCap = 'round';
      this.context.lineJoin = 'round';
      this.context.lineWidth = 5;
      this.context.strokeStyle = '#000000';
    },
    // ペンモード(赤)
    penRed: function(){
      // カーソル変更
      this.canvasMode = 'penRed'

      // 描画設定
      this.context.lineCap = 'round';
      this.context.lineJoin = 'round';
      this.context.lineWidth = 5;
      this.context.strokeStyle = '#FF0000';
    },
    // ペンモード(青)
    penBlue: function(){
      // カーソル変更
      this.canvasMode = 'penBlue'

      // 描画設定
      this.context.lineCap = 'round';
      this.context.lineJoin = 'round';
      this.context.lineWidth = 5;
      this.context.strokeStyle = '#0000FF';
    },

    ~ 省略 ~
  }
本当は1つのメソッドにまとめて引数で色を選択できる方が良さそうですので、
練習がてら考えてみて下さい。
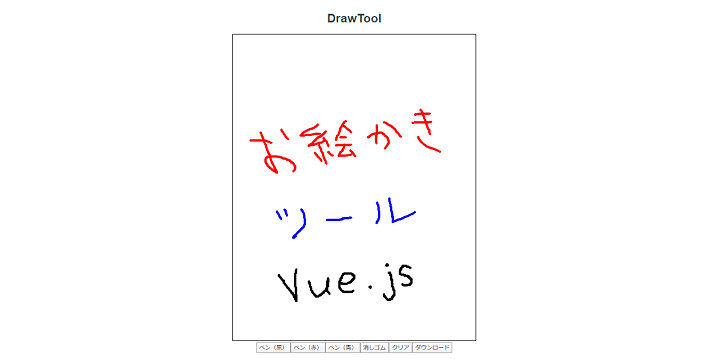
動作確認して、赤や青で描画できていればOKです。
※消しゴムモードの様にペンモードもポインタを変更したいところですが、
やることはあまり変わらないので割愛します。
7.画像ダウンロード機能を実装する
このままではせっかく書いた絵がどこにも残らないので、
保存機能として画像化してダウンロードする機能を実装してみます。
テンプレートにダウンロードボタンを追加します。
<template>
  <div>
    <h1>DrawTool</h1>
    <div id="canvas-area">
      <canvas id="myCanvas" v-bind:class="{eraser: canvasMode === 'eraser'}" width="640px" height="800px" @mousedown="dragStart" @mouseup="dragEnd" @mouseout="dragEnd" @mousemove="draw"></canvas>
    </div>
    <div id="tool-area">
        <button id="pen-black-button" @click="penBlack">ペン(黒)</button>
        <button id="pen-red-button" @click="penRed">ペン(赤)</button>
        <button id="pen-blue-button" @click="penBlue">ペン(青)</button>
        <button id="eraser-button" @click="eraser" >消しゴム</button>
        <button id="clear-button" @click="clear">クリア</button>
        <button id="download-button" @click="download">ダウンロード</button>
    </div>
  </div>
</template>
methodsに以下を追加して完成です。
ファイル名は「canvas-<現在のタイムスタンプ>.png」となるようにしました。
    // 画像ダウンロード
    download: function() {
        let link = document.createElement("a");
        link.href = this.canvas.toDataURL("image/png");
        link.download = 'canvas-' + new Date().getTime() + '.png';
        link.click();
    }
絵をかいてダウンロードボタンをクリックし、画像が保存されることを確認して下さい。
おわり
今回は以上とします。
Vueの勉強も兼ねて作成してみましたが、意外とお絵描き機能がお手軽に作れたので驚きました。
WEBアプリケーション関連 人気連載リンク
基礎からPHPWEBアプリ解発を学ぶなら・・
PHP基礎 連載
より実践的なWEBアプリ開発講座!Bootstrap活用を学ぶなら・・
魁!小野の塾 連載


