
【iOSアプリ・Swift】異なる2色のセルを用いてテーブルビューを作成しよう!その2
異なる2色のセルを用いてテーブルビューを作成しよう!その2
前回に引き続き、異なる2色のセルを用いたテーブルビューを作成していきます。
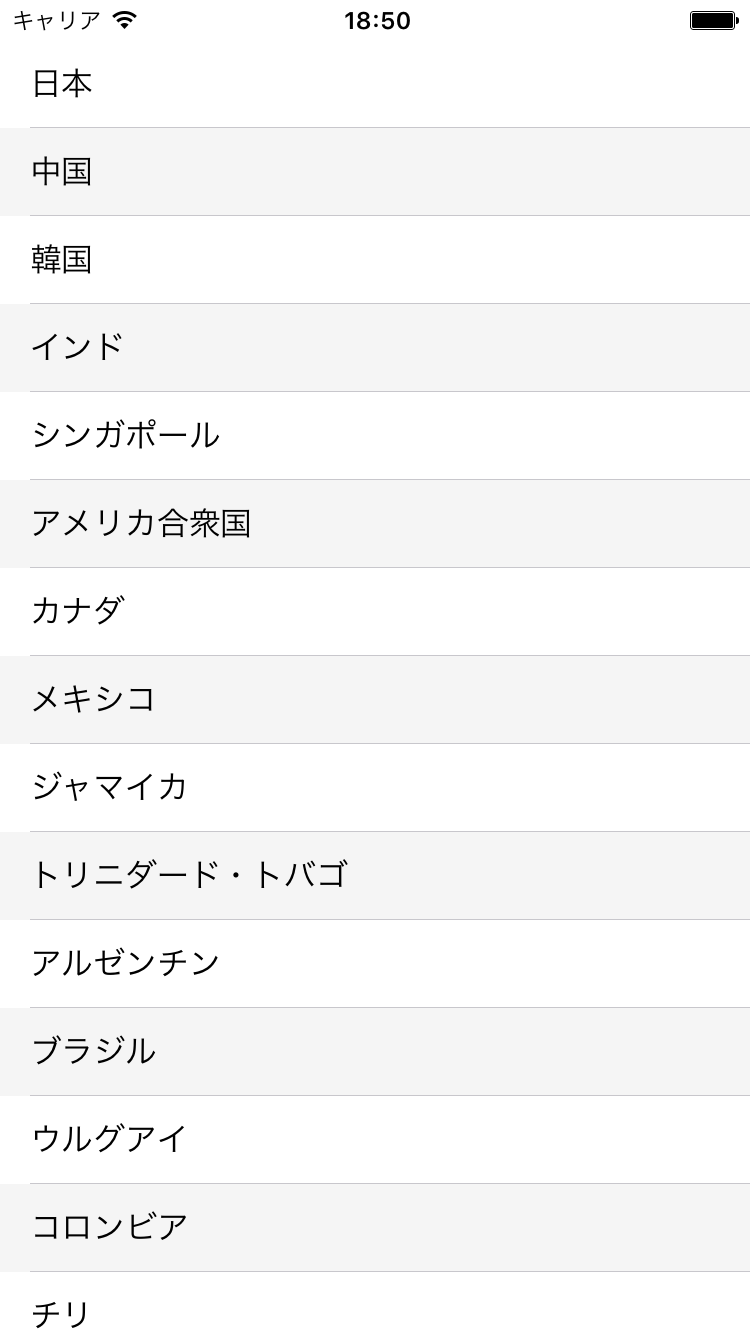
完成系はコチラ。
前回はストーリーボード上での作成と、テーブルビューをコードで扱えるようにするための
下準備まで終わりました。
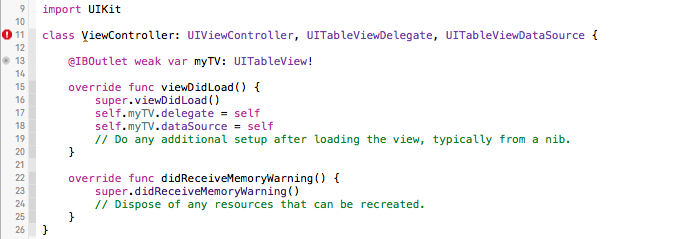
class ViewController: UIViewController, UITableViewDelegate, UITableViewDataSource {
@IBOutlet weak var myTV: UITableView!
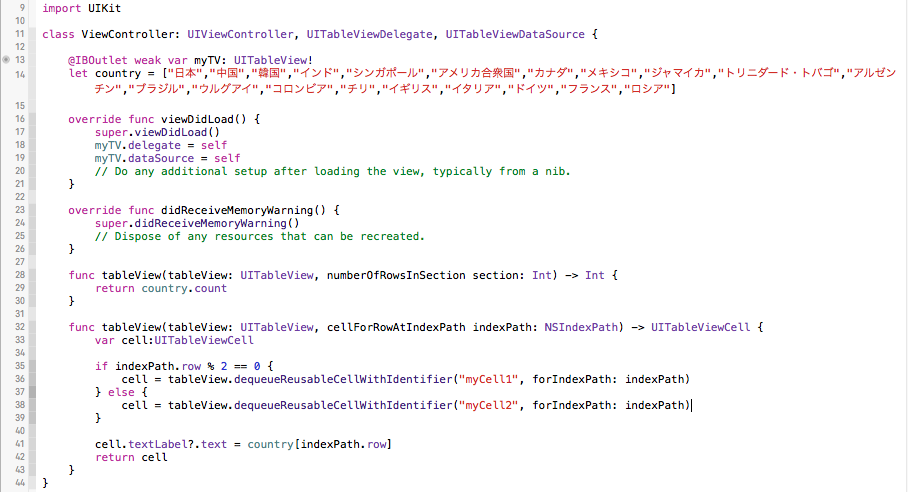
let country = ["日本","中国","韓国","インド","シンガポール","アメリカ合衆国","カナダ","メキシコ","ジャマイカ","トリニダード・トバゴ","アルゼンチン","ブラジル","ウルグアイ","コロンビア","チリ","イギリス","イタリア","ドイツ","フランス","ロシア"]
override func viewDidLoad() {
super.viewDidLoad()
myTV.delegate = self
myTV.dataSource = self
// Do any additional setup after loading the view, typically from a nib.
}
override func didReceiveMemoryWarning() {
super.didReceiveMemoryWarning()
// Dispose of any resources that can be recreated.
}
プロトコルメソッドの実装がされていませんので赤いエラーが表示されてしまっていますね。
それでは続きを作成していきましょう。
STEP3.テーブルビューにデータを表示する
それではテーブルビューに実際にデータを表示していきます。
◼︎表示するデータを配列で作成する
今回も国名を表示するテーブルを作成したいので、適当に国名の配列を作成します。
let country = ["日本","中国","韓国","インド","シンガポール","アメリカ合衆国","カナダ","メキシコ","ジャマイカ","トリニダード・トバゴ","アルゼンチン","ブラジル","ウルグアイ","コロンビア","チリ","イギリス","イタリア","ドイツ","フランス","ロシア"]
◼︎tableView(tableView: UITableView, numberOfRowsInSection section: Int) -> Intメソッド
このメソッドはセルの個数を返すメソッドでした。このメソッドの戻り値に指定した値の数だけ
セルが作成される形になります。以下のメソッドを追加記述します。
func tableView(tableView: UITableView, numberOfRowsInSection section: Int) -> Int {
    return country.count
}
配列countryの要素の個数だけセルを作成するようにしています。
◼︎tableView(tableView: UITableView, cellForRowAtIndexPath indexPath: NSIndexPath) -> UITableViewCellメソッド
このメソッドは表示するセルを返すメソッドでした。
この部分で条件分岐して、量産するセルをmyCell1とmyCell2とに場合分けするようにします。
今まではこんな感じで記述していました。
func tableView(tableView: UITableView, cellForRowAtIndexPath indexPath: NSIndexPath) -> UITableViewCell {
    let cell = tableView.dequeueReusableCellWithIdentifier("myCell1", forIndexPath: indexPath)
    cell.textLabel?.text = country[indexPath.row]
    return cell
}
myCell1を使ってひたすら量産していました。
それが今回はこんな感じ。
func tableView(tableView: UITableView, cellForRowAtIndexPath indexPath: NSIndexPath) -> UITableViewCell {
    var cell:UITableViewCell

    if indexPath.row % 2 == 0 {
        cell = tableView.dequeueReusableCellWithIdentifier("myCell1", forIndexPath: indexPath)
    } else {
        cell = tableView.dequeueReusableCellWithIdentifier("myCell2", forIndexPath: indexPath)
    }

    cell.textLabel?.text = country[indexPath.row]
    return cell
}
if文を使って偶数行ではmyCell1を使ってデータを表示し、奇数行ではmyCell2を使ってデータを表示する
ようにしています。
こうすることで交互に異なる識別子のセルを使用することができるようになっています。
すべてのコードをまとめるとこのようになります。
import UIKit

class ViewController: UIViewController, UITableViewDelegate, UITableViewDataSource {

    @IBOutlet weak var myTV: UITableView!
    let country = ["日本","中国","韓国","インド","シンガポール","アメリカ合衆国","カナダ","メキシコ","ジャマイカ","トリニダード・トバゴ","アルゼンチン","ブラジル","ウルグアイ","コロンビア","チリ","イギリス","イタリア","ドイツ","フランス","ロシア"]

    override func viewDidLoad() {
        super.viewDidLoad()
        myTV.delegate = self
        myTV.dataSource = self
        // Do any additional setup after loading the view, typically from a nib.
    }

    override func didReceiveMemoryWarning() {
        super.didReceiveMemoryWarning()
        // Dispose of any resources that can be recreated.
    }

    func tableView(tableView: UITableView, numberOfRowsInSection section: Int) -> Int {
        return country.count
    }

    func tableView(tableView: UITableView, cellForRowAtIndexPath indexPath: NSIndexPath) -> UITableViewCell {
        var cell:UITableViewCell

        if indexPath.row % 2 == 0 {
            cell = tableView.dequeueReusableCellWithIdentifier("myCell1", forIndexPath: indexPath)
        } else {
            cell = tableView.dequeueReusableCellWithIdentifier("myCell2", forIndexPath: indexPath)
        }

        cell.textLabel?.text = country[indexPath.row]
        return cell
    }
}
いちおう画像でも載せておきます。
いかがだったでしょうか。今までのちょっとした応用でこのようにテーブルビューをカスタマイズすることができますね。
色々なものを試しながら作成してテーブルビューを自在に扱えるようにしましょう!
TechProjin 開発系基礎講座 連載リンク
基礎からPHPWEBアプリ解発を学ぶなら・・
PHP基礎 連載
AIなどで注目急上昇!これから学ぶならPython!!
独学で学ぶ-pythonプログラミング 連載
汎用性◎ 定番プログラミング言語JAVA
Java基礎講座 連載


