Twitter Bootstrap 3 の基本 フォームのサンプル3
Twitter Bootstrap 3 の基本 フォームのサンプル3
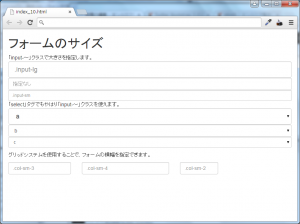
前回作成したフォームのサイズ変更をしていきます。
基本的にクラスを指定することでフォームサイズの変更ができます。
グリッドシステム同様に、横幅をグリッド数指定で決めることが可能です。
それでは早速サンプルを見ていきましょう。
サンプル:フォームサイズを変更する方法
<!DOCTYPE html>
<html lang="ja">
<head>
	<meta charset="utf-8">
	<link rel="stylesheet" href="https://maxcdn.bootstrapcdn.com/bootstrap/3.3.4/css/bootstrap.min.css">
	<script src="https://ajax.googleapis.com/ajax/libs/jquery/1.11.2/jquery.min.js"></script>
	<script src="https://maxcdn.bootstrapcdn.com/bootstrap/3.3.4/js/bootstrap.min.js"></script>
</head>
<body>
<div class="container-fluid">
<h1>フォームのサイズ</h1>
	<p>
	「input-~」クラスで大きさを指定します。<br>
	<input class="form-control input-lg" type="text" placeholder=".input-lg">
	<input class="form-control" type="text" placeholder="指定なし">
	<input class="form-control input-sm" type="text" placeholder=".input-sm">
	「select」タグでもやはり「input-~」クラスを使えます。<br>
	<select class="form-control input-lg"><option value="a">a</option></select>
	<select class="form-control"><option value="b">b</option></select>
	<select class="form-control input-sm"><option value="c">c</option></select>
	</p>

	<p>
		グリッドシステムを使用することで、フォームの横幅を指定できます。<br>
		<div class="row">
			<div class="col-sm-3">
				<input type="text" class="form-control" placeholder=".col-sm-3">
			</div>
			<div class="col-sm-4">
				<input type="text" class="form-control" placeholder=".col-sm-4">
			</div>
			<div class="col-sm-2">
				<input type="text" class="form-control" placeholder=".col-sm-2">
			</div>
		</div>
	</p>
</div><!-- /container -->
</body>
</html>
まとめ
今回はフォームのサイズについてみてきました。次回はボタンの作成方法を見ていきます。
WEBアプリケーション関連 人気連載リンク
基礎からPHPWEBアプリ開発を学ぶなら・・
PHP基礎 連載
より実践的なWEBアプリ開発講座!Bootstrap活用を学ぶなら・・
魁!小野の塾 連載


