
【iPhoneアプリ・Swift】セクション分けしたテーブルビューを表示してみよう!その2
セクション分けしたテーブルビューを表示してみよう!
前回の続きです。前回はセクション分けしてセクション名を表示するところまで実装しました。
セクション分けをするには以下の2つのメソッド
numberOfSectionsInTableView(tableView: UITableView) -> Intメソッド
tableView(tableView: UITableView, titleForHeaderInSection section: Int) -> String?メソッド
を実装すればいいんでしたね!
前回の続きですので、国名を各大陸ごとにセクション分けしたものを作っていきますよー。
条件はこんな感じ。
※各大陸ごとに5つの国を適当に選出しています。
※今回は画面全体にテーブルビューを配置しています。
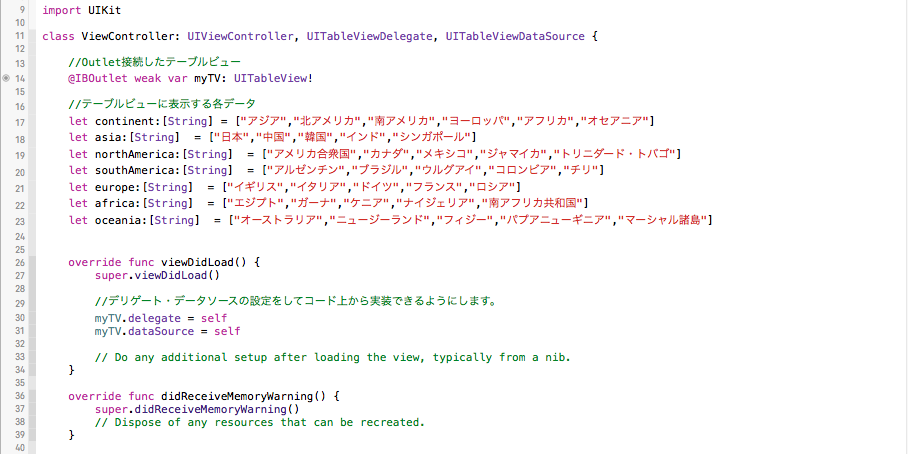
前回までに実装したコードはコチラ。
import UIKit
class ViewController: UIViewController, UITableViewDelegate, UITableViewDataSource {
@IBOutlet weak var myTV: UITableView!
let continent:[String] = ["アジア","北アメリカ","南アメリカ","ヨーロッパ","アフリカ","オセアニア"]
let asia:[String] = ["日本","中国","韓国","インド","シンガポール"]
let northAmerica:[String] = ["アメリカ合衆国","カナダ","メキシコ","ジャマイカ","トリニダード・トバゴ"]
let southAmerica:[String] = ["アルゼンチン","ブラジル","ウルグアイ","コロンビア","チリ"]
let europe:[String] = ["イギリス","イタリア","ドイツ","フランス","ロシア"]
let africa:[String] = ["エジプト","ガーナ","ケニア","ナイジェリア","南アフリカ共和国"]
let oceania:[String] = ["オーストラリア","ニュージーランド","フィジー","パプアニューギニア","マーシャル諸島"]
override func viewDidLoad() {
super.viewDidLoad()
myTV.delegate = self
myTV.dataSource = self
// Do any additional setup after loading the view, typically from a nib.
}
override func didReceiveMemoryWarning() {
super.didReceiveMemoryWarning()
// Dispose of any resources that can be recreated.
}
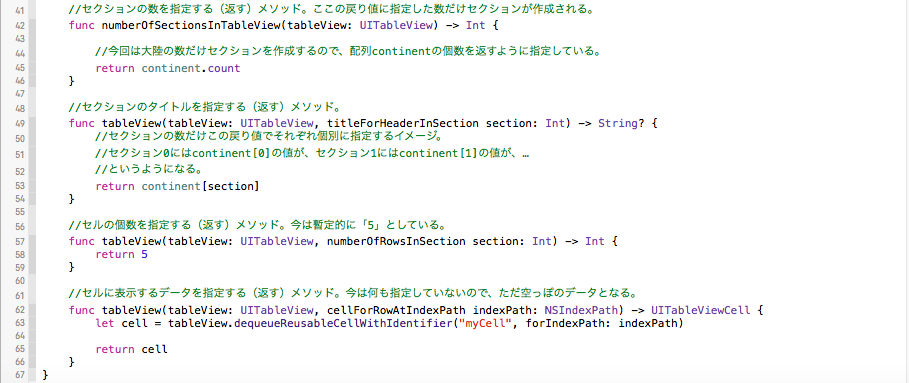
func numberOfSectionsInTableView(tableView: UITableView) -> Int {
return continent.count
}
func tableView(tableView: UITableView, titleForHeaderInSection section: Int) -> String? {
return continent[section]
}
func tableView(tableView: UITableView, numberOfRowsInSection section: Int) -> Int {
return 5
}
func tableView(tableView: UITableView, cellForRowAtIndexPath indexPath: NSIndexPath) -> UITableViewCell {
let cell = tableView.dequeueReusableCellWithIdentifier("myCell", forIndexPath: indexPath)
return cell
}
}
コメント付きの画像も載せておきます。長いので半分ずつにして載せてます。
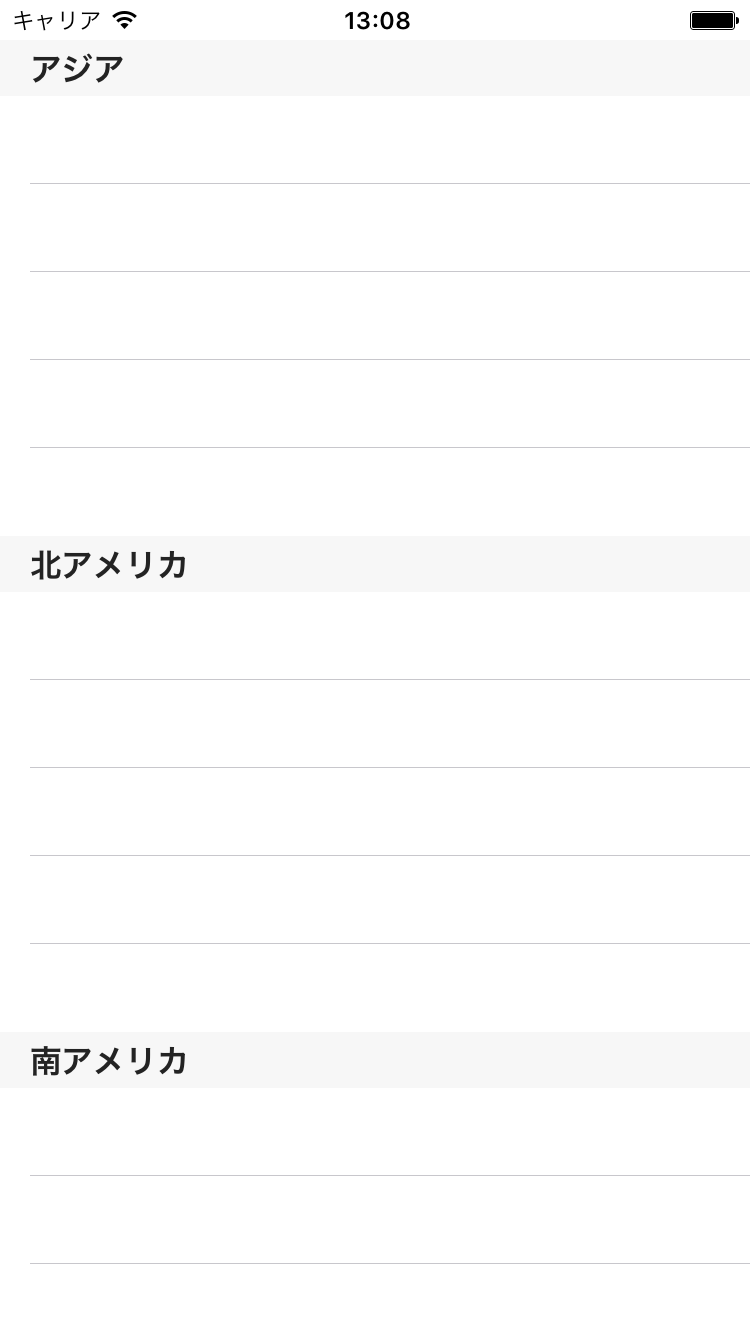
そして出来上がったものがコチラ。
今回はこのセクションの中のセルに国名のデータを実装していきたいと思います。
STEP4.セルを表示するメソッドの中身を実装する
以下の部分を変更していきます。このメソッドは必須メソッドですので前回はとりあえず値を
入れただけでしたね。
//セルの個数を指定する(返す)メソッド。今は暫定的に「5」としている。
func tableView(tableView: UITableView, numberOfRowsInSection section: Int) -> Int {
    return 5
}

//セルに表示するデータを指定する(返す)メソッド。今は何も指定していないので、ただ空っぽのデータとなる。
func tableView(tableView: UITableView, cellForRowAtIndexPath indexPath: NSIndexPath) -> UITableViewCell {
    let cell = tableView.dequeueReusableCellWithIdentifier("myCell", forIndexPath: indexPath)

    return cell
}
◼︎tableView(tableView: UITableView, numberOfRowsInSection section: Int) -> Intメソッド
このメソッドはセルの個数を返すメソッドでした。今まではセクション分けをしていなかったため、
func tableView(tableView: UITableView, numberOfRowsInSection section: Int) -> Int {
    return 5
}
と記述すれば、5つのセルが作成されるという簡単なものでした。
今回はセクション分けをしているため、セクションごとにセルの個数を指定する必要があります。
具体的にいうと、セクション番号ごとに条件分岐をして記述するんです。
記述方法は以下のようになります。
func tableView(tableView: UITableView, numberOfRowsInSection section: Int) -> Int {
    switch section {
    case 0:
        return asia.count
    case 1:
        return northAmerica.count
    case 2:
        return southAmerica.count
    case 3:
        return europe.count
    case 4:
        return africa.count
    case 5:
        return oceania.count
    default:
        return 0
    }
}
第2引数の「section」ごとにそのセクションのセルの個数を指定することができます。
このように条件分岐することで、0番目のセクションには配列asiaの個数を、
1番目のセクションには配列northAmericaの個数を、…
というように個別にセクション内のセルの個数を指定することができます。
まぁ今回はどのセクションも5カ国の表示なので、
func tableView(tableView: UITableView, numberOfRowsInSection section: Int) -> Int {
    return 5
}
でも問題と言えば問題ないですが。。
それぞれのセルの個数がバラバラの場合は条件分岐で分けてあげないとダメってことですね。
◼︎tableView(tableView: UITableView, cellForRowAtIndexPath indexPath: NSIndexPath) -> UITableViewCellメソッド
このメソッドも考え方は同じです。セクションごとに条件分岐を記述してあげる形になります。
しかし、このメソッドには「section」という引数は存在しないため、第2引数の「indexPath」を使います。
記述方法は以下のようになります。
func tableView(tableView: UITableView, cellForRowAtIndexPath indexPath: NSIndexPath) -> UITableViewCell {
    let cell = tableView.dequeueReusableCellWithIdentifier("myCell", forIndexPath: indexPath)
    switch indexPath.section {
    case 0:
        cell.textLabel?.text = asia[indexPath.row]
    case 1:
        cell.textLabel?.text = northAmerica[indexPath.row]
    case 2:
        cell.textLabel?.text = southAmerica[indexPath.row]
    case 3:
        cell.textLabel?.text = europe[indexPath.row]
    case 4:
        cell.textLabel?.text = africa[indexPath.row]
    case 5:
        cell.textLabel?.text = oceania[indexPath.row]
    default:
        break
    }

    return cell
}
indexPath.sectionでセクション番号を取得することができます。そのセクション番号ごとに条件分岐して、
セクションごとにセルのタイトルを設定していけばいいんですね!
さぁこれで完成です。実際にビルドしてみましょう!

ちゃんとセクションごとに国名が表示されていることが確認できます。
一応最後にすべてのコードを載せておきます。
import UIKit

class ViewController: UIViewController, UITableViewDelegate, UITableViewDataSource {

    //Outlet接続したテーブルビュー
    @IBOutlet weak var myTV: UITableView!

    //テーブルビューに表示する各データ
    let continent:[String] = ["アジア","北アメリカ","南アメリカ","ヨーロッパ","アフリカ","オセアニア"]
    let asia:[String]  = ["日本","中国","韓国","インド","シンガポール"]
    let northAmerica:[String]  = ["アメリカ合衆国","カナダ","メキシコ","ジャマイカ","トリニダード・トバゴ"]
    let southAmerica:[String]  = ["アルゼンチン","ブラジル","ウルグアイ","コロンビア","チリ"]
    let europe:[String]  = ["イギリス","イタリア","ドイツ","フランス","ロシア"]
    let africa:[String]  = ["エジプト","ガーナ","ケニア","ナイジェリア","南アフリカ共和国"]
    let oceania:[String]  = ["オーストラリア","ニュージーランド","フィジー","パプアニューギニア","マーシャル諸島"]


    override func viewDidLoad() {
        super.viewDidLoad()

        myTV.delegate = self
        myTV.dataSource = self

        // Do any additional setup after loading the view, typically from a nib.
    }

    override func didReceiveMemoryWarning() {
        super.didReceiveMemoryWarning()
        // Dispose of any resources that can be recreated.
    }

    //セクションの数を指定する(返す)メソッド
    func numberOfSectionsInTableView(tableView: UITableView) -> Int {
        return continent.count
    }

    //セクションのタイトルを指定する(返す)メソッド
    func tableView(tableView: UITableView, titleForHeaderInSection section: Int) -> String? {
        return continent[section]
    }

    //セクション内に表示するセルの個数を指定する(返す)メソッド
    func tableView(tableView: UITableView, numberOfRowsInSection section: Int) -> Int {
        switch section {
        case 0:
            return asia.count
        case 1:
            return northAmerica.count
        case 2:
            return southAmerica.count
        case 3:
            return europe.count
        case 4:
            return africa.count
        case 5:
            return oceania.count
        default:
            return 0
        }
    }

    //セクション内に表示するセルの中身を指定する(返すメソッド)
    func tableView(tableView: UITableView, cellForRowAtIndexPath indexPath: NSIndexPath) -> UITableViewCell {
        let cell = tableView.dequeueReusableCellWithIdentifier("myCell", forIndexPath: indexPath)
        switch indexPath.section {
        case 0:
            cell.textLabel?.text = asia[indexPath.row]
        case 1:
            cell.textLabel?.text = northAmerica[indexPath.row]
        case 2:
            cell.textLabel?.text = southAmerica[indexPath.row]
        case 3:
            cell.textLabel?.text = europe[indexPath.row]
        case 4:
            cell.textLabel?.text = africa[indexPath.row]
        case 5:
            cell.textLabel?.text = oceania[indexPath.row]
        default:
            break
        }

        return cell
    }
}
いかがだったでしょうか。設定することが多かったりメソッドが長かったりで複雑に感じてしまうかも
しれませんが、しっかりとセクション分けしたテーブルビューの作成方法をマスターしておきましょう!
おしまい。
TechProjin 開発系基礎講座 連載リンク
基礎からPHPWEBアプリ解発を学ぶなら・・
PHP基礎 連載
AIなどで注目急上昇!これから学ぶならPython!!
独学で学ぶ-pythonプログラミング 連載
汎用性◎ 定番プログラミング言語JAVA
Java基礎講座 連載


