
今回の内容
今回からはゲームクリア時の実装を進めていきます。
まずはプレイヤー関連の演出を実装します。
やや作業量が多いですが、頑張って進めましょう。
※初めての方はこちらから
⇒ 【第1回記事】導入とサンプルの紹介
ゲームの状態を管理する
クリア時だけでなく、今後ゲームオーバー時やプレイ中などのゲーム状態を管理する必要がでてきます。
そこで1つスクリプトを作成し、ゲーム状態を管理するための Enum を作成します。
新規スクリプトを作成し、名前を GameManagerScript とします。
以下を記述しましょう。
using System.Collections;
using System.Collections.Generic;
using UnityEngine;

public class GameManagerScript : MonoBehaviour
{
    public enum GAME_STATUS { Play, Clear, Pause, GameOver };
    public static GAME_STATUS status;

    void Start()
    {
        // ステータスをPlayに
        status = GAME_STATUS.Play;
    }

    void Update()
    {

    }
}
Play(プレイ中)、Clear(クリア時)、Pause(一時停止)、GameOver(ゲームオーバー時)の4つの状態を用意しました。
ゲーム開始時に Play に設定しておきます。
シーンに空のオブジェクトを作成し、名前を GameManager とします。
GameManager に GameManagerScript をアタッチしておきましょう。

ここでは GameManagerScript はこれ以上触りませんが、今後変更を加えて行くことにはなるので、
存在は覚えておきましょう。
(関連記事)
Enumを使ってゲーム中の状態や条件をわかりやすく管理しよう
クリア時のプレイヤーのアニメーション設定
クリアした際のプレイヤーのアニメーションを設定します。
Player を選択して Animatorビューを開き、Trigger型のパラメータ Clear を追加します。
さらに、Projectビューから Unitychan > Animations > unitychan_WIN00 > WIN00 を追加します。
AnyState から WIN00 へ遷移を作成してください。
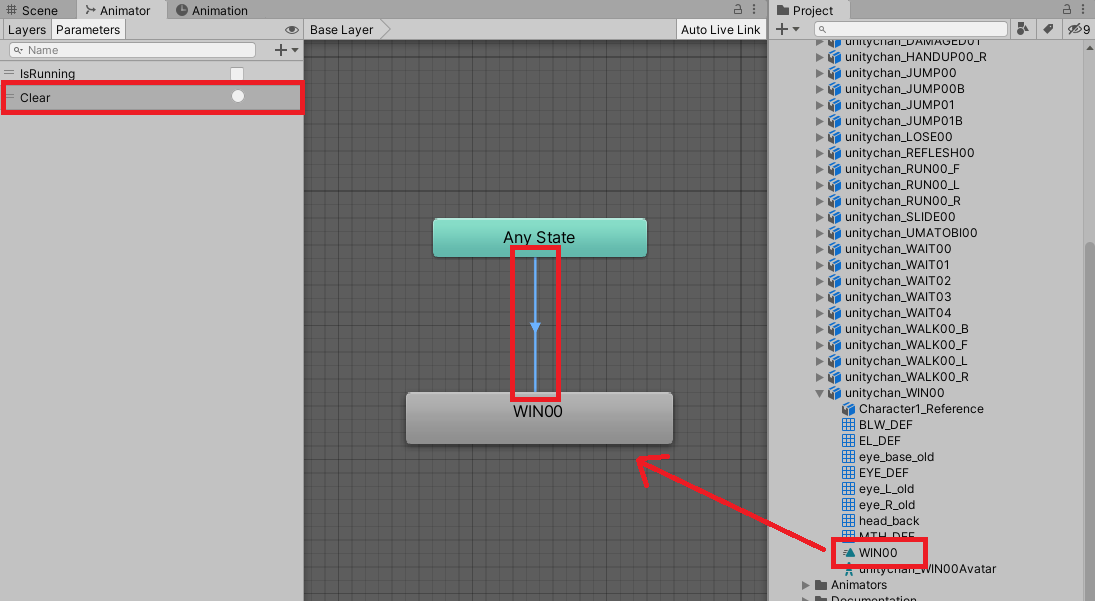
遷移条件に Clear を設定します。

アニメーションの準備はこれで完了です。
(関連記事)
アニメーションの遷移を検証①【遷移条件】
クリア時のプレイヤーの演出
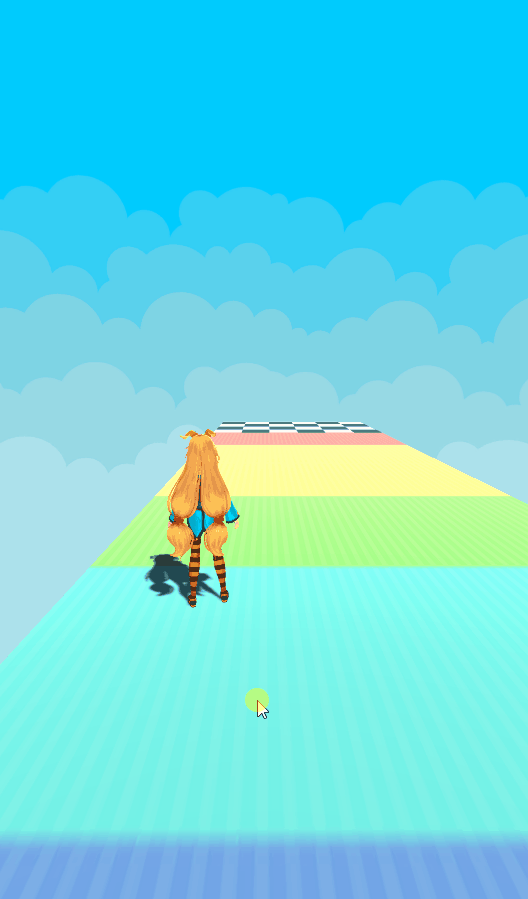
クリア時(クリア地点到達時)にプレイヤーには以下の行動をさせます。
・ゴール地点(最終地点)に向かって移動
・ゴール地点に到達後、180度回転してアニメ再生
なお、ここでいうクリア地点、ゴール地点は以下のイメージです。
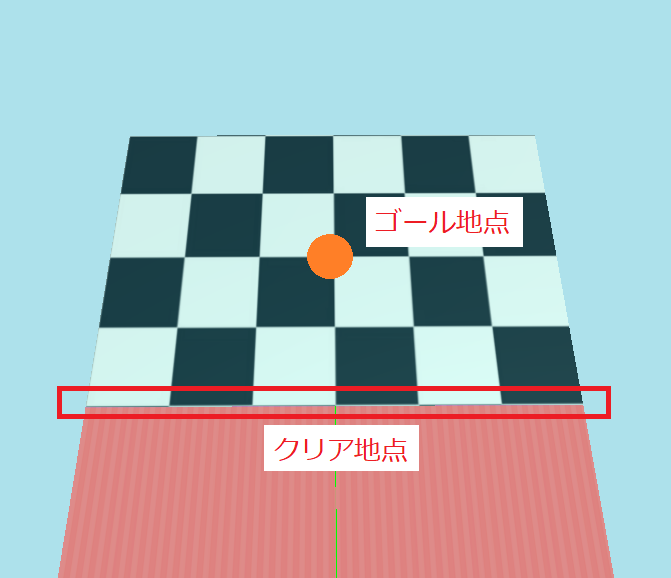
クリア地点に到達したら、最終地点であるゴール地点へと強制的に移動させて演出を実行します。
実装の第1段階として、クリア地点に触れた時に呼び出されるメソッドを作成し、
そのタイミングで目的地としてゴール地点を設定し、ゲーム状態を Clear に変更します。
PlayerScript を以下に変更してください。
using System.Collections;
using System.Collections.Generic;
using UnityEngine;

public class PlayerScript : MonoBehaviour
{
    Animator animator;

    public bool isRunning;

    public float sensitivity = 1f;
    const float LOAD_WIDTH = 6f;
    const float MOVE_MAX = 2.5f;
    Vector3 previousPos, currentPos;

    Vector3 dest; // 次の目的地。クリア時に使用

    void Start()
    {
        animator = GetComponent<Animator>();
    }

    void Update()
    {
        // スワイプによる移動処理
        if (Input.GetMouseButtonDown(0))
        {
            previousPos = Input.mousePosition;
        }
        if (Input.GetMouseButton(0))
        {
            // スワイプによる移動距離を取得
            currentPos = Input.mousePosition;
            float diffDistance = (currentPos.x - previousPos.x) / Screen.width * LOAD_WIDTH;
            diffDistance *= sensitivity;

            // 次のローカルx座標を設定 ※道の外にでないように
            float newX = Mathf.Clamp(transform.localPosition.x + diffDistance, -MOVE_MAX, MOVE_MAX);
            transform.localPosition = new Vector3(newX, 0, 0);

            // タップ位置を更新
            previousPos = currentPos;
        }

        // isRunning = true; ※削除してください
        animator.SetBool("IsRunning", isRunning);
    }

    public void Clear(Vector3 pos)
    {
        GameManagerScript.status = GameManagerScript.GAME_STATUS.Clear;
        dest = pos;
    }
}
クリア後の目的地を設定するためのプロパティ dest と、クリア時に呼び出される Clearメソッドを追加しました。
※あえて「ゴール地点」では無く「目的地」の意味でプロパティを作成しているのは、
クリア時以外の強制的な移動のケースでも利用できることを想定しています。
とはいえ、この連載内ではクリア時以外は触れないので、読者様側での改造用となります。
続けて、ゲーム状態が Clear になったときの処理を Update 内に記述します。
using System.Collections;
using System.Collections.Generic;
using UnityEngine;

public class PlayerScript : MonoBehaviour
{
    Animator animator;

    public bool isRunning;

    public float sensitivity = 1f;
    const float LOAD_WIDTH = 6f;
    const float MOVE_MAX = 2.5f;
    Vector3 previousPos, currentPos;

    Vector3 dest; // 次の目的地。クリア時に使用
    float speed = 6f;

    void Start()
    {
        animator = GetComponent<Animator>();
    }

    void Update()
    {
        // クリア時の処理
        if (GameManagerScript.status == GameManagerScript.GAME_STATUS.Clear)
        {
            // 目的地の方向を向く
            transform.LookAt(dest);

            // 目的地の方向に移動させる
            Vector3 dir = (dest - transform.position).normalized;
            transform.position += dir * speed * Time.deltaTime;

            // 目的地に十分近づいたら、最終演出
            if ((dest - transform.position).magnitude < 0.5f)
            {
                transform.position = dest;
                transform.rotation = Quaternion.Euler(0, 180, 0);
                animator.SetBool("IsRunning", false);
                animator.SetTrigger("Clear");

                enabled = false;
            }
            return;
        }

        // スワイプによる移動処理
        if (Input.GetMouseButtonDown(0))
        {
            previousPos = Input.mousePosition;
        }
        if (Input.GetMouseButton(0))
        {
            // スワイプによる移動距離を取得
            currentPos = Input.mousePosition;
            float diffDistance = (currentPos.x - previousPos.x) / Screen.width * LOAD_WIDTH;
            diffDistance *= sensitivity;

            // 次のローカルx座標を設定 ※道の外にでないように
            float newX = Mathf.Clamp(transform.localPosition.x + diffDistance, -MOVE_MAX, MOVE_MAX);
            transform.localPosition = new Vector3(newX, 0, 0);

            // タップ位置を更新
            previousPos = currentPos;
        }

        // isRunning = true; ※削除してください
        animator.SetBool("IsRunning", isRunning);
    }

    public void Clear(Vector3 pos)
    {
        GameManagerScript.status = GameManagerScript.GAME_STATUS.Clear;
        dest = pos;
    }
}
一旦PlayerScript側の準備はこれでOKです。
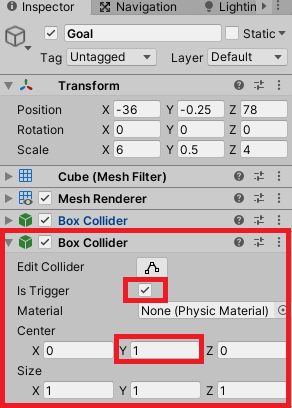
ゴール床にトリガーを設定
Goalオブジェクトにプレイヤーが触れたら、
先ほど作成した PlayerScript の Clearメソッドを発火するように Goalオブジェクトを変更します。
Goalオブジェクトに BoxCollider を追加して、以下の設定とします。
新規スクリプトを作成して名前を GoalScript とし、以下を記述してください。
using System.Collections;
using System.Collections.Generic;
using UnityEngine;

public class GoalScript : MonoBehaviour
{
    Vector3 centerPos;

    void Start()
    {
        centerPos = new Vector3(transform.position.x, 0, transform.position.z);
    }

    private void OnTriggerEnter(Collider other)
    {
        if (other.CompareTag("Player"))
        {
            other.GetComponent<PlayerScript>().Clear(centerPos);
        }
    }
}
これを Goalオブジェクトにアタッチすれば、Goalオブジェクト関連の準備は完了です。
(関連記事)
当たり判定の取り方②(ぶつからない編)
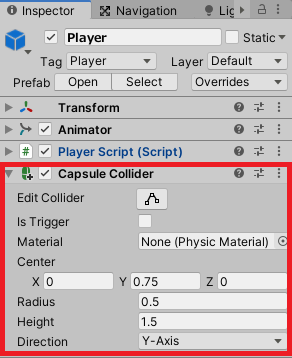
コライダーの設定
ここまでのスクリプトを眺めてみて下さい。
なんとなくPlayer が Goal に触れれば クリア関連の処理が実行されそうですが、
実際に実行してみても Goal床の手前で止まって何も起こらないはずです。
実はここまで Player にコライダーを設定していなかったため、
Goalオブジェクトに触れた際の Triggerイベントが発火されていないのが原因です。
そこで Playerオブジェクトに CapsuleCollider を追加して、下記の設定とします。
今度こそ‥と思って実行してみても、実はまだ上手く動きません。
これは Player が MovementBase の子要素となっているのが原因で、
以下の記事がちょうど検証をしてくれています。
【Unity】 子オブジェクトの衝突が検知される条件(外部リンク)
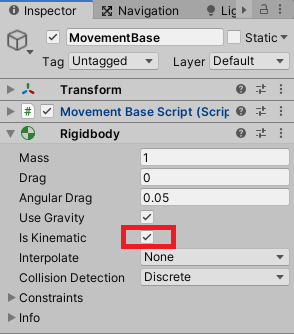
そこで MovementBase に Rigidbody を追加します。
物理演算は不要なので、Is Kinematic にチェックを入れておきましょう。
ようやくこれで、クリア時の演出が実行されるはずです。
ヘルプUIの表示設定
現状、クリア演出後もヘルプUIが表示されてしまっているので、
ヘルプUIはゲーム状態が Play の場合だけ表示するように変更します。
MovementBaseScript を以下に変更してください。
using PathCreation;
using System.Collections;
using System.Collections.Generic;
using UnityEngine;

public class MovementBaseScript : MonoBehaviour
{
    [SerializeField]
    PathCreator pathCreator;

    [SerializeField]
    PlayerScript player;

    [SerializeField]
    GameObject helpUI;

    float speed = 6f;
    Vector3 endPos;

    float moveDistance;

    void Start()
    {
        endPos = pathCreator.path.GetPoint(pathCreator.path.NumPoints - 1);
    }

    void Update()
    {
        // プレイ中以外は無効にする
        if (GameManagerScript.status != GameManagerScript.GAME_STATUS.Play)
        {
            helpUI.SetActive(false);
            return;
        }

        // タップ中は走る
        if (Input.GetMouseButton(0))
        {
            moveDistance += speed * Time.deltaTime;
            transform.position = pathCreator.path.GetPointAtDistance(moveDistance, EndOfPathInstruction.Stop);
            transform.rotation = pathCreator.path.GetRotationAtDistance(moveDistance, EndOfPathInstruction.Stop);

            player.isRunning = true;
            helpUI.SetActive(false);
        }
        else if (Input.GetMouseButtonUp(0))
        {
            player.isRunning = false;
            helpUI.SetActive(true);
        }
    }
}
クリア後にヘルプUIが非表示となっていればOKです。
(関連記事)
プログラムからGameObjectやComponentの有効無効を切り替える
speedの共通化
最後に、今回の記事で PlayerScript に speed を追加しましたが、
MovementBaseScript にも speed があり、管理が少し煩雑になってしまっています。
これを共通化したいと思います。
今回は PlayerScript 側で speed を管理して、MovementBaseScript では PlayerScript側から読み込む実装とします。
まずは PlayerScript で、speed を public に変更します。
public float speed = 6f;
次に MovementBaseScript を下記の通り変更します。
using PathCreation;
using System.Collections;
using System.Collections.Generic;
using UnityEngine;

public class MovementBaseScript : MonoBehaviour
{
    [SerializeField]
    PathCreator pathCreator;

    [SerializeField]
    PlayerScript player;

    [SerializeField]
    GameObject helpUI;

    Vector3 endPos;

    float moveDistance;

    void Start()
    {
        endPos = pathCreator.path.GetPoint(pathCreator.path.NumPoints - 1);
    }

    void Update()
    {
        // プレイ中以外は無効にする
        if (GameManagerScript.status != GameManagerScript.GAME_STATUS.Play)
        {
            helpUI.SetActive(false);
            return;
        }

        // タップ中は走る
        if (Input.GetMouseButton(0))
        {
            moveDistance += player.speed * Time.deltaTime;
            transform.position = pathCreator.path.GetPointAtDistance(moveDistance, EndOfPathInstruction.Stop);
            transform.rotation = pathCreator.path.GetRotationAtDistance(moveDistance, EndOfPathInstruction.Stop);

            player.isRunning = true;
            helpUI.SetActive(false);
        }
        else if (Input.GetMouseButtonUp(0))
        {
            player.isRunning = false;
            helpUI.SetActive(true);
        }
    }
}
17行目の上にあった、speed の宣言は削除しています。
38行目の speed を取得する所を、PlayerScript から取得する形に変更しています。
念のため動作確認して、変更前と同様に動いていれば成功です。
(関連記事)
Time.deltaTimeの基本的な使い方
おわりに
作業箇所が多かったですが、一旦これでクリア時のプレイヤー関連の演出が完成です。
次回は引き続きクリア関連で、クリア時の紙吹雪の演出を作成したいと思います!
関連リンク ➡ 「初心者のための」Unityゲーム制作 目次
© Unity Technologies Japan/UCL


