クロスプラットフォーム対応のモバイルアプリ開発フレームワークであるIonic2の使い方を紹介していきます。
今回はIonicでボタンを表示する方法とその簡単なカスタマイズ方法について解説します。
なお、本稿で載せる画像は全てMaterialDesignのスタイルです。iOSでは異なる見た目になる点にご注意下さい。
使い方
IonicではWeb同様ボタンを表示するにはHTMLテンプレートにbuttonタグを記述します。もちろんそのままだと見た目がアレなので、ion-buttonというディレクティブをbuttonの属性に指定します。これにより各プラットフォームに合わせた見た目を出力してくれます。
...
<button ion-button>Default</button>
...

色を変える
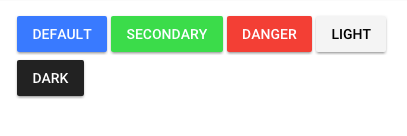
ボタンはデフォルトでは、/src/theme/variable.scssで宣言されているprimaryの色が適用されます。
$colors: (
  primary:    #387ef5,
  secondary:  #32db64,
  danger:     #f53d3d,
  light:      #f4f4f4,
  dark:       #222
);
これらの名前を用いることでボタンの色を変更できます。
...
  <div class="buttons">
    <button ion-button>Default</button>
    <button ion-button color="secondary">Secondary</button>
    <button ion-button color="danger">Danger</button>
    <button ion-button color="light">Light</button>
    <button ion-button color="dark">Dark</button>
  </div>
...
アウトライン表示
枠とと文字だけに色をつけたアウトライン表示のボタンも簡単に実装できます。
次のようにoutlineディレクティブをつけるだけです。
...
    <button ion-button outline>Default</button>
    <button ion-button color="secondary" outline>Secondary</button>
...
形を指定する
エッジを丸くしたり、横幅に合わせたブロック表示など形状を指定できます。
丸くする場合はround、ブロック表示はblockをそれぞれ指定します。
...
    <button ion-button round>Round</button>
    <button ion-button block>Block</button>
...
アイコンを乗せる
Ionicは様々なアイコンが用意されています。(Ionicons)
これらを使ってアイコン付きのボタンが簡単に実装できます。
...
    <button ion-button icon-left>
      <ion-icon name="heart"></ion-icon>
      アイコン左表示
    </button>
    <button ion-button icon-right>
    アイコン右表示
      <ion-icon name="heart"></ion-icon>
    </button>
    <button ion-button icon-only>
      <ion-icon name="heart"></ion-icon>
    </button>
...
サイズを変える
ボタンのサイズを変えたい場合はlargeまたはsmallディレクティブを用います。
...
    <button ion-button large>Large</button>
    <button ion-button>Default</button>
    <button ion-button small>Small</button>
...


