![Android UI 基本 文字入力[EditText]](https://tech.pjin.jp/wp-content/uploads/2015/09/Android_page.png)
Androidアプリを作る上での基本的なUIの使い方を解説します。
EditText
大抵のアプリでユーザが文字を入力する場面は出てきますよね。
ユーザ情報の入力であったり、チャットの内容の入力であったり。
そんなユーザに文字情報を入力してもらう際に使うのがウィジェットが
EditTextになります。
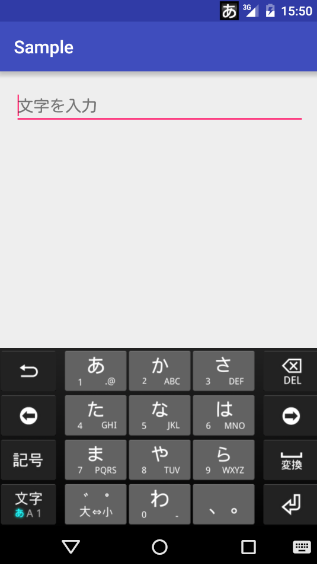
レイアウトxmlにEditText要素を配置します。
///...
    <EditText
        android:id="@+id/edit_text"
        android:layout_width="match_parent"
        android:layout_height="wrap_content"
        android:hint="文字を入力"
        />
//...
どのようなテキストをユーザに教えるにはhint属性を用います。
未入力時に指定した文字列が表示されます。
コード側で入力された値を取得するにはEditText#getText()を用いればOKです。
EditText editText = (EditText) findViewById(R.id.edit_text);
String text = editText.getText().toString();
inputType
<EditText>にはinputTypeという属性が用意されており、これに指定する値を変えることで入力に制限を加えたり、
挙動を変えることができます。
使える値を幾つかあげたいと思います。
| text | 通常のテキスト |
| number | 数字オンリー |
| textPassword | パスワード(入力した文字が隠れる) |
| textMultiLine | 通常のテキストだが、改行ができる |
| phone | 電話番号 |
| textAutoCorrect | 電話番号 |
    <EditText
        android:id="@+id/edit_text"
        android:layout_width="match_parent"
        android:layout_height="wrap_content"
        android:hint="文字を入力"
        android:inputType="textMultiLine"
        />
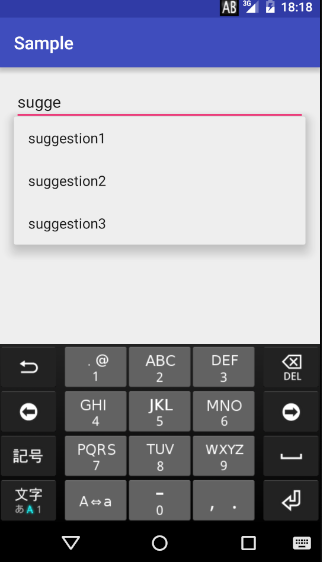
入力補完
ユーザの入力に対して補完提示をしたい場合はAutoCompleteTextViewという
EditTextのサブクラスを使います。
    <AutoCompleteTextView
        android:id="@+id/autocomplete"
        android:layout_width="match_parent"
        android:layout_height="wrap_content" />
補完で表示する候補は自分でxmlファイルに文字列を定義しておく必要があります。
<resources>
    <string-array name="suggestions">
        <item>suggestion1</item>
        <item>suggestion2</item>
        <item>suggestion3</item>
    </string-array>
</resources>
コードでこのリソースを読み込みAdapterを用いてAutoCompleteTextViewにセットしてあげます。
        AutoCompleteTextView autocomplete = (AutoCompleteTextView)findViewById(R.id.autocomplete);
        String[] suggestions = getResources().getStringArray(R.array.suggestions);
        ArrayAdapter<String> adapter =
                new ArrayAdapter<>(this, android.R.layout.simple_list_item_1, suggestions);
        autocomplete.setAdapter(adapter);