デバイスメモリにデータを保存してみよう
デバイスメモリへ保存!
※はじめに
この記事はAndroidアプリの開発が、初心者であるという方のための記事です。
そのため、なるべく複雑な説明は避け、コピー&ペイストですぐに動くものをご紹介します。
JavaやAndroidを理解されている方で細かい説明が必要な方は、当ブログ内の連載記事である「Android Tips」をご覧ください。
今回は入力内容をデバイスメモリに保存するアプリです。
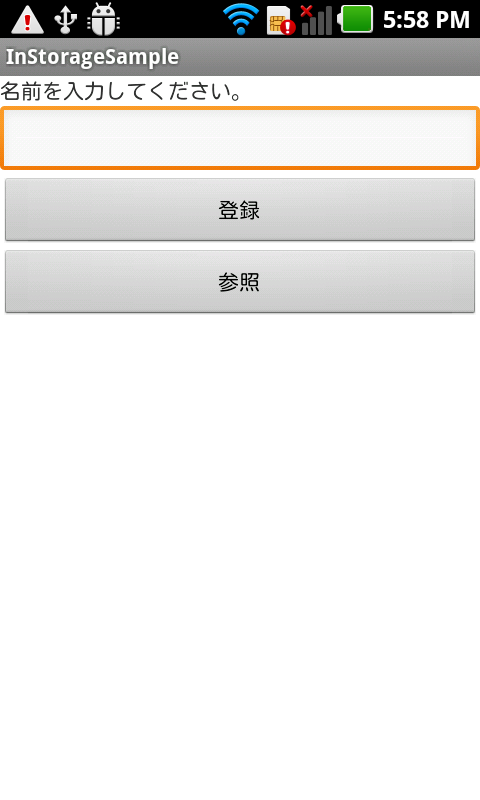
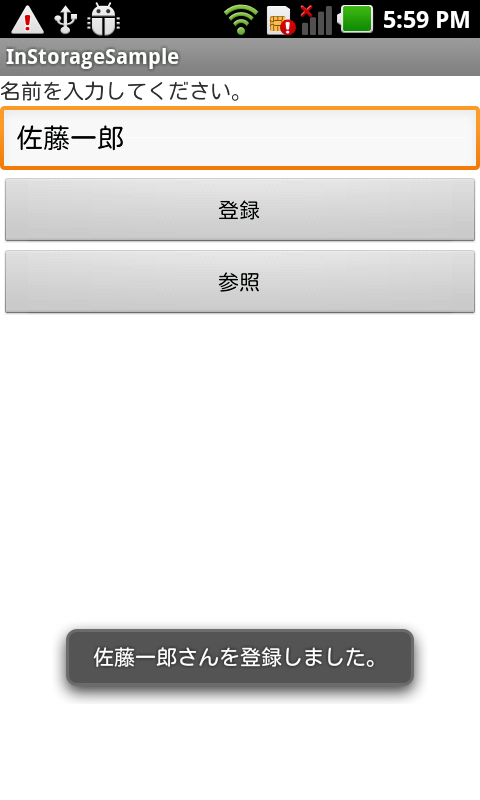
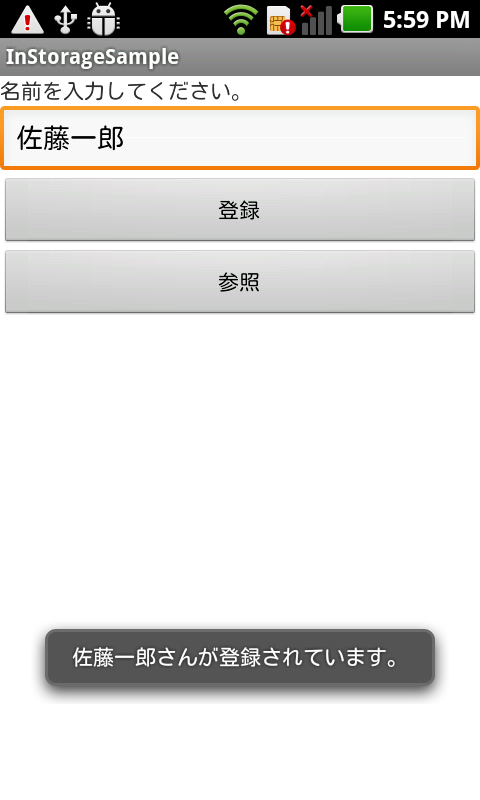
アプリ情報
このアプリはEditTextに入力した内容を「登録」Buttonを押下することにより登録し、「参照」Buttonを押下することにより登録されている内容をToastを用いて表示させています。前回のSDカードと基本的には同じですが、ポイントは以下の点です。
アプリ完成図
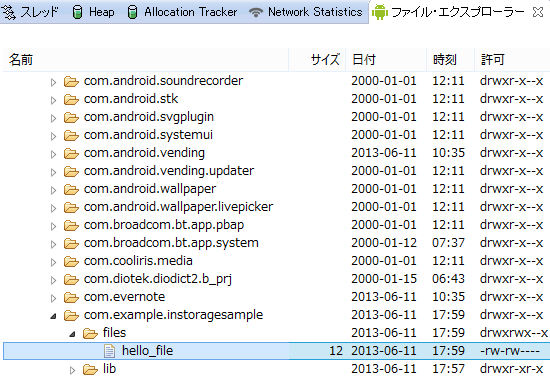
データは「data/data/パッケージ名/files/」内に保存されています。
MainActivity.java(ソースコード)
activity_main.xmlと紐づきたActivityです。
各ボタンを押下したときの処理を記述しています。
package com.example.instoragesample;

import java.io.FileInputStream;
import java.io.FileOutputStream;
import java.io.IOException;

import android.app.Activity;
import android.content.Context;
import android.os.Bundle;
import android.view.View;
import android.view.View.OnClickListener;
import android.widget.Button;
import android.widget.EditText;
import android.widget.Toast;

public class MainActivity extends Activity {

	String frame = "hello_file";

	@Override
	protected void onCreate(Bundle savedInstanceState) {
		super.onCreate(savedInstanceState);
		setContentView(R.layout.activity_main);

		Button fileOutPutButton = (Button) findViewById(R.id.button1);
		fileOutPutButton.setOnClickListener(new OnClickListener() {

			@Override
			public void onClick(View v) {
				EditText editText = (EditText) findViewById(R.id.editText1);
				String str = editText.getText().toString();

				FileOutputStream fos = null;

				try {
					fos = openFileOutput(frame, Context.MODE_PRIVATE);
					fos.write(str.getBytes());
					Toast.makeText(MainActivity.this, str + "さんを登録しました。",
							Toast.LENGTH_SHORT).show();

				} catch (IOException e) {
					e.printStackTrace();
					Toast.makeText(MainActivity.this, "登録できませんでした。",
							Toast.LENGTH_SHORT).show();

				} finally {

					try {
						if (fos != null)
							fos.close();
					} catch (IOException e) {
						e.printStackTrace();
					}
				}
			}
		});

		Button fileInPutButton = (Button) findViewById(R.id.button2);
		fileInPutButton.setOnClickListener(new OnClickListener() {

			@Override
			public void onClick(View v) {
				FileInputStream fis = null;

				try {
					fis = openFileInput(frame);
					byte buffer[] = new byte[100];
					fis.read(buffer);
					String str = new String(buffer).trim();
					Toast.makeText(MainActivity.this, str + "さんが登録されています。",
							Toast.LENGTH_SHORT).show();

				} catch (IOException e) {
					e.printStackTrace();
					Toast.makeText(MainActivity.this, "読み込みに失敗しました。。",
							Toast.LENGTH_SHORT).show();

				} finally {

					try {
						if (fis != null)
							fis.close();
					} catch (IOException e) {
						e.printStackTrace();
					}

				}

			}
		});
	}

}
activity_main.xml
アプリ起動時に表示されるメイン画面です。
<LinearLayout xmlns:android="http://schemas.android.com/apk/res/android"
    xmlns:tools="http://schemas.android.com/tools"
    android:layout_width="match_parent"
    android:layout_height="match_parent"
    android:orientation="vertical"
    tools:context=".MainActivity" >

    <TextView
        android:id="@+id/textView1"
        android:layout_width="match_parent"
        android:layout_height="wrap_content"
        android:text="名前を入力してください。" />

    <EditText
        android:id="@+id/editText1"
        android:layout_width="match_parent"
        android:layout_height="wrap_content" />

    <Button
        android:id="@+id/button1"
        android:layout_width="match_parent"
        android:layout_height="wrap_content"
        android:text="登録" />

    <Button
        android:id="@+id/button2"
        android:layout_width="match_parent"
        android:layout_height="wrap_content"
        android:text="参照" />

</LinearLayout>
AndroidManifest.xml
<?xml version="1.0" encoding="utf-8"?>
<manifest xmlns:android="http://schemas.android.com/apk/res/android"
    package="com.example.instoragesample"
    android:versionCode="1"
    android:versionName="1.0" >

    <uses-sdk
        android:minSdkVersion="7"
        android:targetSdkVersion="17" />

    <application
        android:allowBackup="true"
        android:icon="@drawable/ic_launcher"
        android:label="@string/app_name"
        android:theme="@style/AppTheme" >
        <activity
            android:name="com.example.instoragesample.MainActivity"
            android:label="@string/app_name" >
            <intent-filter>
                <action android:name="android.intent.action.MAIN" />

                <category android:name="android.intent.category.LAUNCHER" />
            </intent-filter>
        </activity>
    </application>

</manifest>
これでOKです。


