自作のアプリからカレンダーの編集画面に移動する
※はじめに
この記事はAndroidアプリの開発が、初心者であるという方のための記事です。
そのため、なるべく複雑な説明は避け、コピー&ペイストですぐに動くものをご紹介します。
JavaやAndroidを理解されている方で細かい説明が必要な方は、当ブログ内の連載記事である「Android Tips」をご覧ください。
今回はカレンダーに連動させるアプリです。
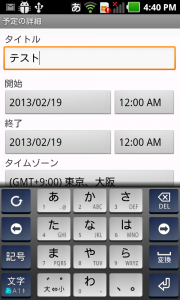
下図のように自作のアプリのボタンを押下すると、カレンダーアプリの予定編集画面に移動します。
前回に引き続き、暗黙的インテントを用いています。
アプリの操作
- Buttonを押下
- カレンダーの予定編集画面に移動
- 予定を入力し登録する
- カレンダーに登録される
アプリ情報
アプリ完成図


MainActivity.java(ソースコード)
package com.example.schedulesample;

import android.app.Activity;
import android.content.Intent;
import android.os.Bundle;
import android.view.View;
import android.view.View.OnClickListener;
import android.widget.Button;

public class MainActivity extends Activity {

	@Override
	protected void onCreate(Bundle savedInstanceState) {
		super.onCreate(savedInstanceState);
		setContentView(R.layout.activity_main);

		Button b1 = (Button) findViewById(R.id.button1);
		b1.setOnClickListener(new OnClickListener() {

			@Override
			public void onClick(View v) {
				Intent scjIntent = new Intent(Intent.ACTION_EDIT);
				scjIntent.setType("vnd.android.cursor.item/event");
				scjIntent.putExtra("title", "");
				scjIntent.putExtra("description", "");
				startActivity(scjIntent);
			}
		});
	}
}
activity_main.xml
今回の画面の定義(activity_main.xml)は下記になります。
<RelativeLayout xmlns:android="http://schemas.android.com/apk/res/android"
    xmlns:tools="http://schemas.android.com/tools"
    android:layout_width="match_parent"
    android:layout_height="match_parent"
    android:paddingBottom="@dimen/activity_vertical_margin"
    android:paddingLeft="@dimen/activity_horizontal_margin"
    android:paddingRight="@dimen/activity_horizontal_margin"
    android:paddingTop="@dimen/activity_vertical_margin"
    tools:context=".MainActivity" >

    <Button
        android:id="@+id/button1"
        android:layout_width="fill_parent"
        android:layout_height="wrap_content"
        android:layout_alignParentLeft="true"
        android:layout_alignParentRight="true"
        android:layout_alignParentTop="true"
        android:text="予定を作成" />

</RelativeLayout>
これでOKです。


