ステータスバー通知は、システムのステータスバーにアイコン(オプションでテロップメッセージと一緒に)を、さらに”Notifications” ウィンドウに展開メッセージを表示する仕組みのことです。
ユーザが展開メッセージをクリックしたときに、Androidは (通常は Activity を起動するために) 定義されたIntentを発信することができ、サウンドやバイブレーション、およびフラッシュライトでユーザに警告をするために、通知を設定することも可能です。
下のスクリーンショットは、左側に通知アイコンがあるステータスバーの例です。
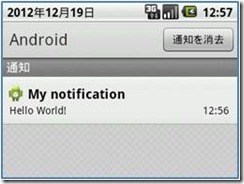
ユーザは、ステータスバーから引き下ろすことによりNotificationsウィンドウを表示させることができます。 ( Home のオプションメニューから Notifications を選択しても表示させることができます。 )
次のスクリーンショットは、展開メッセージを Notificationsウィンドウに表示している例です。
展開メッセージをクリックすると事前に準備したIntentが発行され、Activityが起動したりなどを行うことができます。
ステータスバー通知はActivity または Service から行うことができます。
ただし、一般的にはサービスから行う方がよいでしょう。(アクティビティはバックグラウンド処理ができないからです。)
ステータスバー通知を行うには、 Notification と NotificationManager の 2 つのクラスを使用します。
処理の流れは4ステップです。
- NotificationManagerオブジェクトを取得する
- PendingIntentオブジェクトを作成する
- Notificationオブジェクトを作成する
- notify()メソッドを呼び出す
では、順に見ていきます。
1. NotificationManagerオブジェクトを取得する
NotificationManager notificationManager =
              (NotificationManager) getSystemService(Context.NOTIFICATION_SERVICE);
これはとても簡単です。
getSystemService()メソッドを呼び出し、キャストするだけです。(センサーやロケーションを扱うときと同じですね。)
2. PendingIntentオブジェクトを作成する
PendingIntent(ペンディングインテント)はIntentを即座に発行するのではなく、タイミング (時間を指定もしくはイベント発生時) を指定して発行することができるIntentのことです。
ここでは、通知メッセージをクリックしたとき(すなわち即時発行ではない)にIntentを発行するため、PendingIntentとする必要があります。
以下のように作成します。
Intent notificationIntent = new Intent(this, MainActivity.class);
PendingIntent contentIntent = PendingIntent.getActivity(this, 0, notificationIntent, 0);
ここでは、明示的なインテントを使いMainActivityを表示するIntentオブジェクトを作成しています。
2行目では、1行目で作成したIntentを使ってPendingIntentを作成しています。
PendingIntentを作成するには、発行先に応じた3つのメソッドを使い分ける必要があります。
|
メソッド名 |
概要 |
|
getActivity(Context, int, Intent, int) |
新たなActivityを開始するためのPendingIntentを取得する |
|
getBroadcast(Context, int, Intent, int) |
新たなBroadcastReceiverを開始するためのPendingIntentを取得する |
|
getService(Context, int, Intent, int) |
新たなService開始するためのPendingIntentを取得する |
ここでは、MainActivityを開始するため、getActivity()メソッドを使用しています。
3. Notificationオブジェクトを作成する
Notification notification = new NotificationCompat.Builder(this)
        .setSmallIcon(R.drawable.ic_launcher)    // アイコン
        .setTicker("Hello")                      // 通知バーに表示する簡易メッセージ
        .setWhen(System.currentTimeMillis())     // 時間
        .setContentTitle("My notification")      // 展開メッセージのタイトル
        .setContentText("Hello Notification!!")  // 展開メッセージの詳細メッセージ
        .setContentIntent(contentIntent)         // PendingIntent
        .build();
Notificationオブジェクトを作成する方法はいくつかあります。
- Notificationクラスをnewする (非推奨)
- Notification.Builderクラスをnewし、build()メソッドを使用する (APIレベル11以上)
- NotificationCompat.Builderクラスをnewし、build()メソッドを使用する (APIレベル4以上)
以前は1つ目の方法が用いられていましたが、現在は非推奨となっています。
それに変わって2つ目の方法が推奨されるようになりましたが、こちらのクラスはAPIレベル11(Android 3.0)以上でないと使用することができず、Android 2.3が活躍している現在ではまだ使用するのをためらってしまいます。
そこで、3つ目の方法を紹介しました。
この方法は、Androidプロジェクトにサポートライブラリをリンクさせることで使用可能となり、APIレベル4以上(Android 1.6!!!)をサポートしています。
Notificationに関する様々なパラメータはセッターメソッドを用いて設定します。
ここではアイコン、通知バーに表示する簡単なメッセージ、時間、展開メッセージのタイトルおよび詳細メッセージとインテントを設定しています。
4. notify()メソッドを呼び出す
最後にNotificationManager.notify(int, Notification)メソッドを呼び出すことで通知が行われます。
notificationManager.notify(1, notification);
第1引数にはアプリケーション内で一意となるNotification用のIDを、第2引数にはNotificationオブジェクトを指定します。
このIDはNotificationの更新が必要な場合、または通知メッセージをクリックすることでユーザーがアプリケーションに戻ってきたときに、どのNotificationがクリックされたかを識別するために使用することができます。
最後に、今回使用したサンプルアプリの全体イメージを紹介します。
レイアウトXMLファイルにはButtonを1つ配置し、idはbutton1としておいてください。ボタンをクリックするとステータスバー通知が行われます。
package com.example.notificationsample;

import android.app.Activity;
import android.app.Notification;
import android.app.NotificationManager;
import android.app.PendingIntent;
import android.content.Intent;
import android.os.Bundle;
import android.support.v4.app.NotificationCompat;
import android.view.View;
import android.view.View.OnClickListener;
import android.widget.Button;

public class MainActivity extends Activity implements OnClickListener {

    @Override
    protected void onCreate(Bundle savedInstanceState) {
        super.onCreate(savedInstanceState);
        setContentView(R.layout.activity_main);

        Button button = (Button) findViewById(R.id.button1);
        button.setOnClickListener(this);
    }

    @Override
    public void onClick(View v) {
        NotificationManager notificationManager = (NotificationManager) getSystemService(NOTIFICATION_SERVICE);

        Intent notificationIntent = new Intent(this, MainActivity.class);
        PendingIntent contentIntent = PendingIntent.getActivity(this, 0, notificationIntent, 0);

        Notification notification = new NotificationCompat.Builder(this)
                .setSmallIcon(R.drawable.ic_launcher) // アイコン
                .setTicker("Hello") // 通知バーに表示する簡易メッセージ
                .setWhen(System.currentTimeMillis()) // 時間
                .setContentTitle("My notification") // 展開メッセージのタイトル
                .setContentText("Hello Notification!!") // 展開メッセージの詳細メッセージ
                .setContentIntent(contentIntent) // PendingIntent
                .build();

        notificationManager.notify(1, notification);
    }
}


