Android ListView・サブアイテム・simple_list_item_2
※はじめに
この記事はAndroidアプリの開発が、初心者であるという方のための記事です。
そのため、なるべく複雑な説明は避け、コピー&ペイストですぐに動くものをご紹介します。
JavaやAndroidを理解されている方で細かい説明が必要な方は、当ブログ内の連載記事である「Android Tips」をご覧ください。
今回はListViewのサブアイテムを用いたアプリです。
アプリの構成
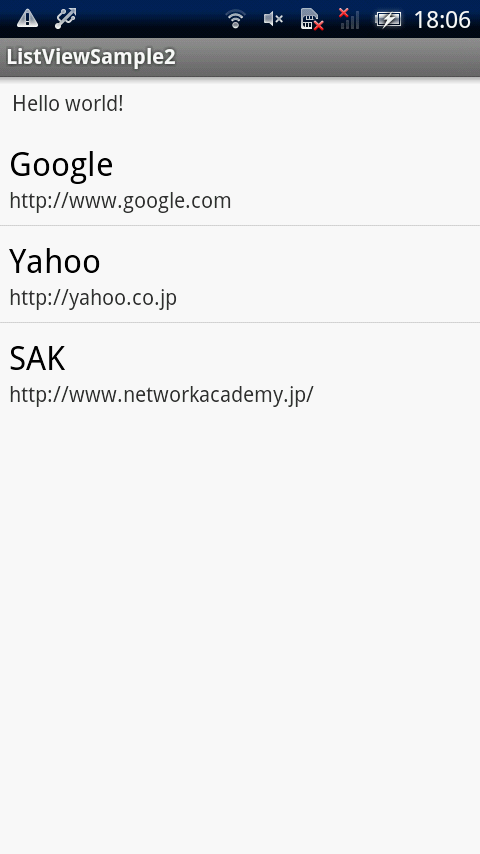
- 通常のListViewにサイト名を表示
- 各サブタイトルにURLを表示
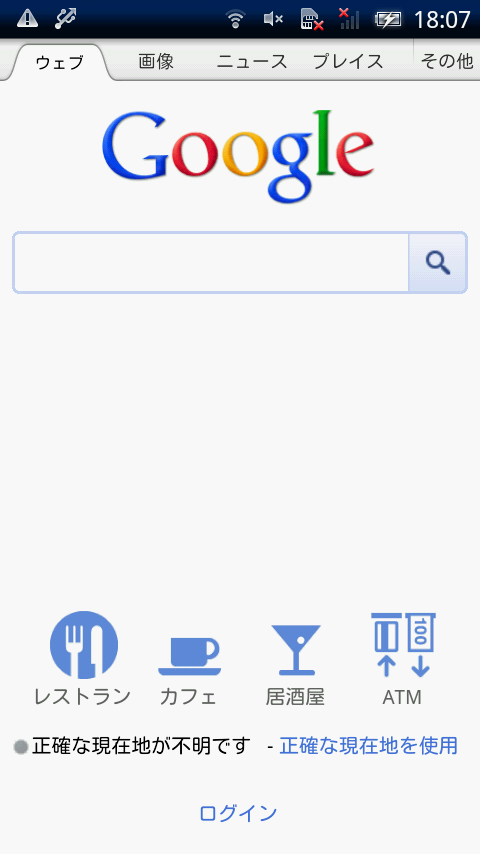
- サブタイトルのURLをintentに乗せて、ブラウザに送る
- 項目をタッチすると、ブラウザが起動
ListViewの項目
アプリ完成図
MainActivity.java(ソースコード)
package com.example.listviewsample2;

import java.util.ArrayList;
import java.util.HashMap;
import java.util.List;
import java.util.Map;

import android.app.Activity;
import android.content.Intent;
import android.net.Uri;
import android.os.Bundle;
import android.view.View;
import android.widget.AdapterView;
import android.widget.AdapterView.OnItemClickListener;
import android.widget.ListView;
import android.widget.SimpleAdapter;

public class MainActivity extends Activity {

	@Override
	public void onCreate(Bundle savedInstanceState) {
		super.onCreate(savedInstanceState);
		setContentView(R.layout.activity_main);

		String[] names = { "Google", "Yahoo", "SAK" };
		final String[] urls = { "http://www.google.com", "http://yahoo.co.jp",
				"http://www.networkacademy.jp/" };

		List<Map<String, String>> contactlist = new ArrayList<Map<String, String>>();

		for (int i = 0; i < names.length; i++) {
			Map<String, String> conMap = new HashMap<String, String>();
			conMap.put("Name", names[i]);
			conMap.put("URL", urls[i]);
			contactlist.add(conMap);
		}

		SimpleAdapter adapter = new SimpleAdapter(this, contactlist,
				android.R.layout.simple_list_item_2, new String[] { "Name",
						"URL" }, new int[] { android.R.id.text1,
						android.R.id.text2 });

		ListView listView = (ListView) findViewById(R.id.listView1);
		listView.setAdapter(adapter);
		listView.setOnItemClickListener(new OnItemClickListener() {

			@SuppressWarnings("unchecked")
			@Override
			public void onItemClick(AdapterView<?> arg0, View arg1, int arg2,
					long arg3) {

				Map<String, String> conMap = (Map<String, String>) arg0
						.getItemAtPosition(arg2);

				Uri uri = Uri.parse(conMap.get("URL"));
				Intent intent = new Intent(Intent.ACTION_VIEW, uri);
				startActivity(intent);
			}
		});
	}
}
activity_main.xml
今回の画面の定義(activity_main.xml)は下記になります。
<RelativeLayout xmlns:android="http://schemas.android.com/apk/res/android"
    xmlns:tools="http://schemas.android.com/tools"
    android:layout_width="fill_parent"
    android:layout_height="fill_parent" >

    <TextView
        android:id="@+id/textView1"
        android:layout_width="wrap_content"
        android:layout_height="wrap_content"
        android:layout_alignParentLeft="true"
        android:layout_alignParentTop="true"
        android:padding="@dimen/padding_medium"
        android:text="@string/hello_world"
        tools:context=".MainActivity" />

    <ListView
        android:id="@+id/listView1"
        android:layout_width="fill_parent"
        android:layout_height="wrap_content"
        android:layout_alignParentLeft="true"
        android:layout_below="@+id/textView1" >
    </ListView>

</RelativeLayout>
listview_sub.xml
<?xml version="1.0" encoding="utf-8"?>
<LinearLayout xmlns:android="http://schemas.android.com/apk/res/android"
    android:layout_width="fill_parent"
    android:layout_height="fill_parent"
    android:orientation="vertical" >

</LinearLayout>
これでOKです。


