LinearLayout
リニアレイアウト(LinearLayoutクラス)は、orientation属性の値によって全ての子要素を決められた方向(横方向もしくは縦方向)に並べるためのレイアウトクラスです。
全ての子要素は順番に上もしくは左から順に並べることができます。
横に並べる場合はhorizontalを、縦に並べる場合はverticalを設定し、デフォルト値はhorizontalとなっています。
また、LinearLayoutは子要素それぞれに対し、layout_weight属性の割り当てを行うことができます。
この属性は、ビューに対して重要度を設定するためのもので、これにより親ビューで余ったスペースいっぱいに拡張されることになります。
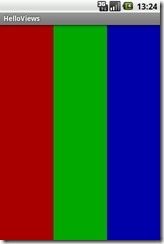
例えば、LinearLayoutに3つの子要素が設定されており、それぞれlayout_weight属性が1、1、1となっていた場合は、
下図のように均等にサイズ割されることになります。

<?xml version="1.0" encoding="utf-8"?>
<LinearLayout xmlns:android="http://schemas.android.com/apk/res/android"
    android:layout_width="fill_parent"
    android:layout_height="fill_parent" >

    <TextView
        android:layout_width="wrap_content"
        android:layout_height="fill_parent"
        android:layout_weight="1"
        android:background="#aa0000" />

    <TextView
        android:layout_width="wrap_content"
        android:layout_height="fill_parent"
        android:layout_weight="1"
        android:background="#00aa00" />

    <TextView
        android:layout_width="wrap_content"
        android:layout_height="fill_parent"
        android:layout_weight="2"
        android:background="#0000aa" />

</LinearLayout>
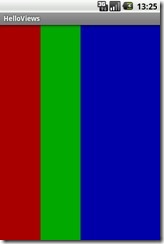
一方、1、1、2と設定されていた場合
下図のように全体の50%を右ビューが占め、残りの50%を左と中央のビューが均等割り(25%ずつ)することになります。
<?xml version="1.0" encoding="utf-8"?>
<LinearLayout xmlns:android="http://schemas.android.com/apk/res/android"
    android:layout_width="fill_parent"
    android:layout_height="fill_parent" >

    <TextView
        android:layout_width="wrap_content"
        android:layout_height="fill_parent"
        android:layout_weight="1"
        android:background="#aa0000" />

    <TextView
        android:layout_width="wrap_content"
        android:layout_height="fill_parent"
        android:layout_weight="1"
        android:background="#00aa00" />

    <TextView
        android:layout_width="wrap_content"
        android:layout_height="fill_parent"
        android:layout_weight="2"
        android:background="#0000aa" />

</LinearLayout>
また、レイアウトを入れ子にすることも可能です。
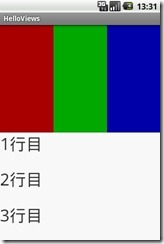
次のサンプルは、画面全体が垂直に定義されたLinearLayoutで、上下2つに分割されています。
さらに上半分は水平方向に3分割されており、下半分は垂直方向に3分割されています。
<?xml version="1.0" encoding="utf-8"?>
<LinearLayout xmlns:android="http://schemas.android.com/apk/res/android"
    android:layout_width="fill_parent"
    android:layout_height="fill_parent"
    android:orientation="vertical" >

    <LinearLayout
        android:layout_width="fill_parent"
        android:layout_height="fill_parent"
        android:layout_weight="1"
        android:orientation="horizontal" >

        <TextView
            android:background="#aa0000"
            android:layout_width="wrap_content"
            android:layout_height="fill_parent"
            android:layout_weight="1" />

        <TextView
            android:background="#00aa00"
            android:layout_width="wrap_content"
            android:layout_height="fill_parent"
            android:layout_weight="1" />

        <TextView
            android:background="#0000aa"
            android:layout_width="wrap_content"
            android:layout_height="fill_parent"
            android:layout_weight="1" />
    </LinearLayout>

    <LinearLayout
        android:layout_width="fill_parent"
        android:layout_height="fill_parent"
        android:layout_weight="1"
        android:orientation="vertical" >

        <TextView
            android:layout_width="fill_parent"
            android:layout_height="wrap_content"
            android:layout_weight="1"
            android:text="1行目"
            android:textSize="15pt" />

        <TextView
            android:layout_width="fill_parent"
            android:layout_height="wrap_content"
            android:layout_weight="1"
            android:text="2行目"
            android:textSize="15pt" />

        <TextView
            android:layout_width="fill_parent"
            android:layout_height="wrap_content"
            android:layout_weight="1"
            android:text="3行目"
            android:textSize="15pt" />
    </LinearLayout>

</LinearLayout>
基礎
 [Android 基礎] リニアレイアウト LinearLayout概要
 [Android 基礎] 相対レイアウト RelativeLayout概要
とっても簡単なAndroidサンプルアプリ集
 【Button・電話・ブラウザ】
 【EditText・TextView・Button】
 【Spinner・TextView】
 【RadioButton・Toast 単体のRadioGroup】
 【RadioButton・Toast 複数のRadioGroup】
 【Spinnerの項目をJavaで記述(MainActivity.javaに記述)・Toast】
 【ProgressDialog・EditTextのnull(未入力)を取得・Button】
 【ListView・配列】
Android TIPS
 Android TIPS 旧バージョンで開発環境を構築する
 Android TIPS 日本アンドロイドの会 2012年7月定例会
 Android TIPS 開発環境の構築①
 Android TIPS 開発環境の構築②
 Android TIPS 開発環境の構築③
 Android TIPS Toastの表示時間を長く/短くする
 Android TIPS HelloWorldプログラムの作成・実行
 Android TIPS HelloWorldプログラムについて
 Android TIPS アプリケーション開発 初級(activity_main.xmlについて)
 Android TIPS アプリケーション開発 初級(strings.xmlについて)
 Android TIPS アプリケーション開発 初級(ローカライズ)
 Android TIPS ボタン(Button)とイベントリスナー
 Android TIPS onClick(View) はスーパークラスのメソッドをオーバーライドする必要があります
 Android TIPS フラグメントでタブレット用レイアウトを作る
 Android TIPS DialogFragmentをつかってAlertDialogを表示する
 Android TIPS DialogFragmentをつかってAlertDialogを表示する(その2)
 Android TIPS タブレットとスマートフォンに対応したアプリケーション
 Android TIPS エミュレータが起動しない(PANIC: Could not open: C:Users…)
ADT Bundle (Android 新開発環境)
 最新のAndroid開発環境【adt-bundle】のまとめ
 ADT Bundleを使って開発環境を構築する(Android SDK revision 21)
 Eclipseを日本語化する(Pleiadesプラグイン使用)
Android講座 体験レポート
 Android講座 体験レポート 第1回
 Android講座 体験レポート 第2回
 Android講座 体験レポート 第3回
 Android講座 体験レポート 第4回
 Android講座 体験レポート 第5回
 Android講座 体験レポート 第6回
 Android講座 体験レポート 第7回
 Android講座 体験レポート 第8回
 Android講座 体験レポート 第9回
 Android講座 体験レポート 第10回
 Android講座 体験レポート 第11回
 Android講座 体験レポート 最終回


