res/layout/activity_main.xml
<LinearLayout xmlns:android="http://schemas.android.com/apk/res/android"
    xmlns:tools="http://schemas.android.com/tools"
    android:layout_width="match_parent"
    android:layout_height="match_parent" >

    <fragment
        android:id="@+id/fragment1"
        android:name="com.example.hellofragment.LeftFragment"
        android:layout_width="match_parent"
        android:layout_height="match_parent"
        android:layout_weight="2" />

    <fragment
        android:id="@+id/fragment2"
        android:name="com.example.hellofragment.RightFragment"
        android:layout_width="match_parent"
        android:layout_height="match_parent"
        android:layout_weight="1" />
</LinearLayout>
res/layout/right_fragment.xml
<?xml version="1.0" encoding="utf-8"?>
<LinearLayout xmlns:android="http://schemas.android.com/apk/res/android"
    android:layout_width="match_parent"
    android:layout_height="match_parent"
    android:orientation="vertical" >

    <WebView
        android:id="@+id/webView1"
        android:layout_width="match_parent"
        android:layout_height="match_parent" />

</LinearLayout>
AndroidManifest.xmlには以下のパーミッションを追加してください
<uses-permission android:name="android.permission.INTERNET"/>
ポイントはactivity_main.xmlに<fragment>タグを追加し、その属性android:nameにFragmentクラスの完全修飾クラス名を指定するところと、
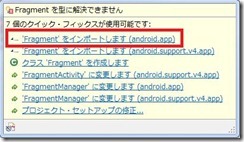
importに「android.appパッケージ」を指定するところでしょうか。
「android.support.v4.appパッケージ」については別途紹介したいと思います。
あとはフラグメント毎(ここでは左のListFragmentと右のWebViewを持ったFragment)にレイアウトファイルを作成するだけです。
今後は、Fragmentの使用が推奨されていくようですので、早いうちに慣れておきたいところです。


