Objective-CでPDFViewer 2回目
Objective-Cを使用してちょっとしたアプリケーションを作成してみようということで前回からPDFViewerを作成しています。
今回はページめくりの機能の部分を見ていきたいと思います。
PDFViewerの基本的な機能はAppleのディベロッパーサイトのZoomingPDFViewerがとても参考になります。
プロジェクトの作成
前回は「Single View Application」からプロジェクトを作成していましたが、今回は「Page-Based Application」テンプレートを使用します。「Page-Based Application」を使用することでページをめくるような感じのUIをもったアプリケーションを簡単に作成できます。

プロジェクト名等を適当につけます。
Page-Based Applicationの確認
作成されたプロジェクトを見てみましょう。
ページをめくる機能を実現するためにいくつかのクラスが用意されているのが確認できます。
「RootViewController」
このクラスで「UIPageViewController」を作成しています。この「UIPageViewController」を使用することで
ページを本のようにめくるようなUIが実現できます。
「DataViewController」
このクラスが表示の部分を行います。ここに前回作成したUIViewをインスタンス化すればPDFの表示ができます。
「ModelController」
このクラスが表示させるページの管理を行います。このクラス内で「DataViewController」を作成しています。
RootViewControllerの確認
まず今回は「RootViewController」からざっとコードを見ていきましょう。
- (void)viewDidLoad
{
    [super viewDidLoad];
	// Do any additional setup after loading the view, typically from a nib.
    // Configure the page view controller and add it as a child view controller.
    self.pageViewController = [[UIPageViewController alloc] initWithTransitionStyle:UIPageViewControllerTransitionStylePageCurl navigationOrientation:UIPageViewControllerNavigationOrientationHorizontal options:nil];
    self.pageViewController.delegate = self;

    DataViewController *startingViewController = [self.modelController viewControllerAtIndex:0 storyboard:self.storyboard];
    NSArray *viewControllers = @[startingViewController];
    [self.pageViewController setViewControllers:viewControllers direction:UIPageViewControllerNavigationDirectionReverse animated:NO completion:nil];

    self.pageViewController.dataSource = self.modelController;

    [self addChildViewController:self.pageViewController];
    [self.view addSubview:self.pageViewController.view];

    // Set the page view controller's bounds using an inset rect so that self's view is visible around the edges of the pages.
    CGRect pageViewRect = self.view.bounds;
    self.pageViewController.view.frame = pageViewRect;

    [self.pageViewController didMoveToParentViewController:self];

    // Add the page view controller's gesture recognizers to the book view controller's view so that the gestures are started more easily.
    self.view.gestureRecognizers = self.pageViewController.gestureRecognizers;
}
Viewが呼び出された際に呼ばれる「viewDidLoad」内で「UIPageViewController」を作成しています。
「initWithTransitionStyle:navigationOrientation:options:」メソッドでインスタンス化しています。
1つ目の引数でページ遷移する際のスタイルを指定します。
「UIPageViewControllerTransitionStylePageCurl」か「UIPageViewControllerTransitionStyleScroll」を
指定します。
前者は本をめくるような感じのUIとなり、後者は横にページがスクロールするUIとなります。
2つ目の引数では上下にページを遷移していくか左右に遷移していくかを指定します。
「UIPageViewControllerNavigationOrientationHorizontal」を指定すると水平にページが遷移していきます。「UIPageViewControllerNavigationOrientationVertical」を指定すると上下にページが遷移していきます。
各組み合わせをみてみましょう
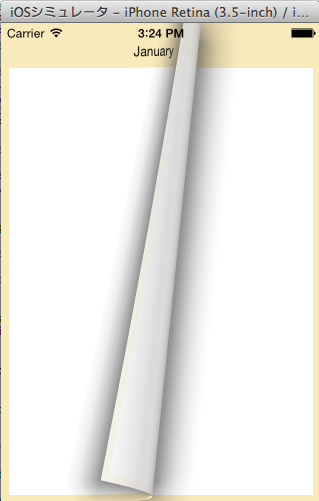
「UIPageViewControllerTransitionStylePageCurl」と「UIPageViewControllerNavigationOrientationHorizontal」
本をめくるようなUIとなります。
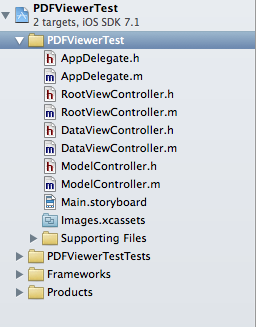
「UIPageViewControllerTransitionStylePageCurl」と「UIPageViewControllerNavigationOrientationVertical」
日めくりカレンダーのようなUIとなります。
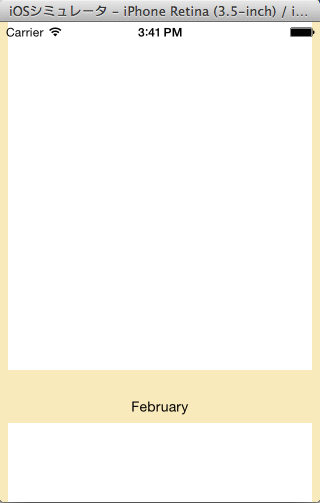
「UIPageViewControllerTransitionStyleScroll」と「UIPageViewControllerNavigationOrientationHorizontal」
左右にスクロールするUIとなります。

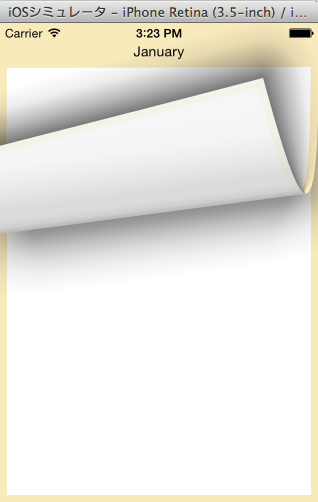
「UIPageViewControllerTransitionStyleScroll」と「UIPageViewControllerNavigationOrientationVertical」
上下にスクロールするUIとなります。
次に表示させるためのビューコントローラを設定しています。
[self.pageViewController setViewControllers:viewControllers direction:UIPageViewControllerNavigationDirectionReverse animated:NO completion:nil];
そしてビューコントローラを供給するオブジェクトを指定します。表示するビューを作成するのはModelControllerなのでそれを指定します。
self.pageViewController.dataSource = self.modelController;
最後にタップやスワイプといったジェスチャーを識別するオブジェクトを指定しています。
self.view.gestureRecognizers = self.pageViewController.gestureRecognizers;
最初の部分で行っているのはざっとこんなところです。
次回以降はその他の部分やModelControllerをみていきます。
TechProjin 開発系基礎講座 連載リンク
基礎からPHPWEBアプリ解発を学ぶなら・・
PHP基礎 連載
AIなどで注目急上昇!これから学ぶならPython!!
独学で学ぶ-pythonプログラミング 連載
汎用性◎ 定番プログラミング言語JAVA
Java基礎講座 連載


