
クロスプラットフォーム対応のモバイルアプリ開発フレームワークであるIonic2の使い方を紹介していきます。
今回はアプリ上でアラートのダイアログを表示する方法について解説します。
なお、本稿で載せる画像は全てMaterialDesignのスタイルです。iOSでは異なる見た目になる点にご注意下さい。
使い方
Ionic2にはAlertControllerというモジュールがあるのでこれを使ってアラートを表示します。
AlertControllerを使うには、アラートを表示したいページ(コンポーネント)でAlertControllerモジュールをimportし、コンストラクタの引数に指定します。
これでAngularのDependencyInjectionの仕組みによりAlertControllerのインスタンスにアクセスできるようになります。
import { Component } from '@angular/core';
import { NavController, AlertController } from 'ionic-angular';

@Component({
  selector: 'page-home',
  templateUrl: 'home.html'
})
export class HomePage {

  constructor(public navCtrl: NavController, private alertCtrl: AlertController) {
  }
}
上の下準備ができたらアラートを表示するメソッドを定義しましょう。
AlertController#createによりAlertオブジェクトが得られるので、Alert#presentでアラートを表示できます。
export class HomePage {
...
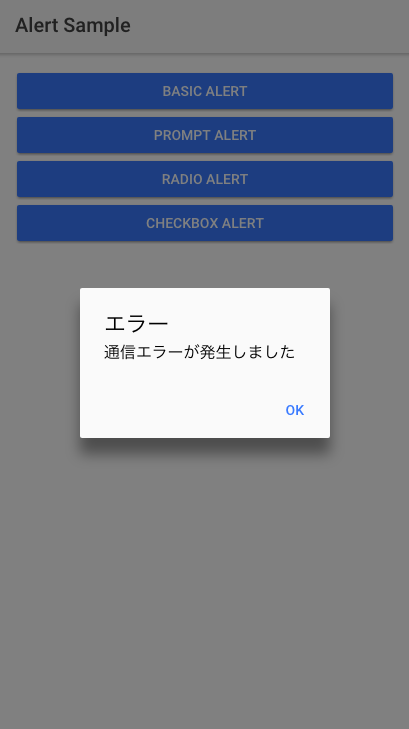
presentBasicAlert() {
let alert = this.alertCtrl.create({
title: 'エラー',
subTitle: '通信エラーが発生しました',
buttons: ['OK']
});
alert.present();
}
}
createの引数オブジェクトのキーに使えるもののうち主に使うのは以下になります。
| title | タイトル |
| subTitle | サブタイトル |
| message | 表示するメッセージ |
| inputs | 入力領域の設定 |
| buttons | 表示するボタンの設定 |
入力ダイアログ
例えばログイン等、ユーザーに入力をしてもらいたい場面で表示するダイアログもAlertControllerを使って作成できます。
inputsキーに入力領域を指定します。typeにはpassword、tel、email、url、number等が指定できます。
export class HomePage {
...
  presentPromptAlert() {
    let alert = this.alertCtrl.create({
      title: 'ログイン',
      inputs: [
        {
          name: 'userId',
          placeholder: 'ユーザーID'
        },
        {
          name: 'password',
          placeholder: 'パスワード',
          type: 'password'
        }
      ],
      buttons: [
        {
          text: 'キャンセル',
          role: 'cancel',
          handler: data => {
          }
        },
        {
          text: 'ログイン',
          handler: data => {
            if (data.userId && data.password) {
              //ログイン処理
            }
          }
        }
      ]
    });

    alert.present();
  }
}
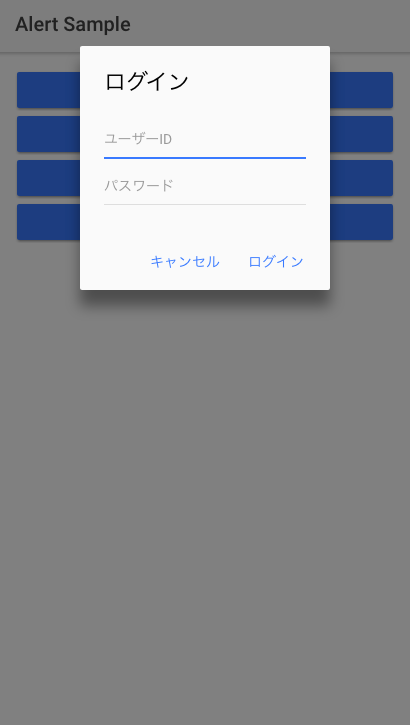
上記の例のようにbuttonsキーには配列で複数のボタンを指定することができます。
handlerにはそのボタンがクリック(タップ)された時の処理を記述します。
また、roleに’cancel’を指定すると、アラートを閉じる用のキャンセルボタンになります。
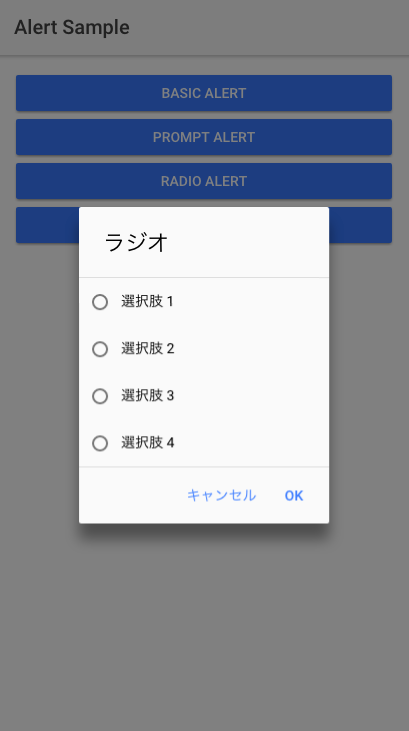
ラジオ
inputのtypeにradioを指定することでラジオボタンを載せたアラートを表示できます。
export class HomePage {
...
  presentRadioAlert() {
    let radioOptions = [];
    for (let i = 1; i < 5; i++) {
      radioOptions.push({type: 'radio', label: `選択肢 ${i}`, value: i, checked: false});
    }

    let alert = this.alertCtrl.create({
      title: 'ラジオ',
      inputs: radioOptions,
      buttons: [
        {
          text: 'キャンセル',
          role: 'cancel',
          handler: data => {
          }
        },
        {
          text: 'OK',
          handler: data => {
          }
        }
      ]
    });

    alert.present();

  }
}
OKボタンのhandlerの引数には選択したラジオのvalueの値が入ってきます。
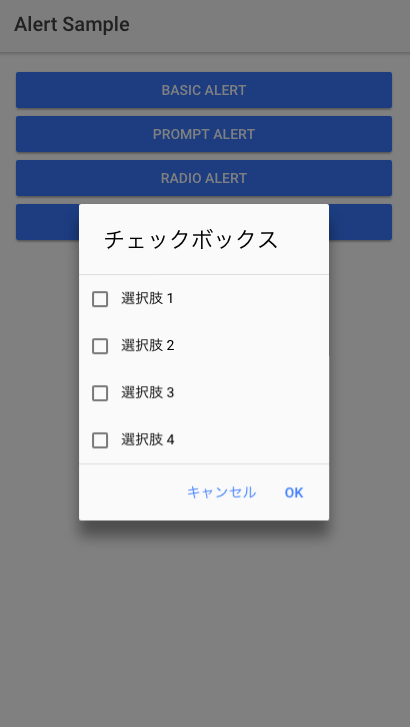
チェックボックス
inputのtypeにcheckboxを指定することでチェックボックスを載せたアラートを表示できます。
export class HomePage {
...
  presentCheckboxAlert() {
    let checkOptions = [];
    for (let i = 1; i < 5; i++) {
      checkOptions.push({type: 'checkbox', label: `選択肢 ${i}`, value: i, checked: false});
    }

    let alert = this.alertCtrl.create({
      title: 'チェックボックス',
      inputs: checkOptions,
      buttons: [
        {
          text: 'キャンセル',
          role: 'cancel',
          handler: data => {
          }
        },
        {
          text: 'OK',
          handler: data => {
          }
        }
      ]
    });

    alert.present();

  }
}
OKボタンのhandlerの引数にはチェックを入れた選択肢のvalueの値が配列で入ってきます。
以上がIonicアプリケーションで各種アラートを表示する方法になります。


